My '76 restoration (long post)

VetteMod - Corvette Restoration, Modding & Performance Forum

Help Support VetteMod Forum:

Talk about funky smells, I tell you this is a true story.....

I was living on the second floor of a high rise, and the parking lot was right below my apartment, all I had to do was drop a cord out the door/balcony and work on a 14' sailboat, I put new mahogany rails on it, painted the hull but noticed the core of the hull was made of stupid balsa wood....which of course soaked up water, so not only heavy as hell, but affected hull integrity....soft floor....so out with the tools and cut out the inner hull, and remove all the rotten wood, so in with styrofoam, layer of cloth and epoxy.....then to put a layer of glass roving and heavy with Fiberglass resin, which of course stunk to holy hell, it was parked not so very far from the main air intake for the entire 500 unit building, so the smell of fiberglass resin went though the entire building and stayed noticeable for a WEEK......stunk people out, headaches, etc.....mgmt was nice to me over that one, BUT...:smash::smash::surrender::eek:
 
Talk about funky smells, I tell you this is a true story.....

I was living on the second floor of a high rise, and the parking lot was right below my apartment, all I had to do was drop a cord out the door/balcony and work on a 14' sailboat, I put new mahogany rails on it, painted the hull but noticed the core of the hull was made of stupid balsa wood....which of course soaked up water, so not only heavy as hell, but affected hull integrity....soft floor....so out with the tools and cut out the inner hull, and remove all the rotten wood, so in with styrofoam, layer of cloth and epoxy.....then to put a layer of glass roving and heavy with Fiberglass resin, which of course stunk to holy hell, it was parked not so very far from the main air intake for the entire 500 unit building, so the smell of fiberglass resin went though the entire building and stayed noticeable for a WEEK......stunk people out, headaches, etc.....mgmt was nice to me over that one, BUT...:smash::smash::surrender::eek:

Why the hell do I have no difficulties believing you?
 
Talk about funky smells, I tell you this is a true story.....

I was living on the second floor of a high rise, and the parking lot was right below my apartment, all I had to do was drop a cord out the door/balcony and work on a 14' sailboat, I put new mahogany rails on it, painted the hull but noticed the core of the hull was made of stupid balsa wood....which of course soaked up water, so not only heavy as hell, but affected hull integrity....soft floor....so out with the tools and cut out the inner hull, and remove all the rotten wood, so in with styrofoam, layer of cloth and epoxy.....then to put a layer of glass roving and heavy with Fiberglass resin, which of course stunk to holy hell, it was parked not so very far from the main air intake for the entire 500 unit building, so the smell of fiberglass resin went though the entire building and stayed noticeable for a WEEK......stunk people out, headaches, etc.....mgmt was nice to me over that one, BUT...:smash::smash::surrender::eek:

Why the hell do I have no difficulties believing you?

HAD I known about the air intake in the parking garage, I could have moved the boat to the side lot or even the street for that matter, I not needing any electric tools to spread the soup around and let it cure....:smash:
 
Gene -
In today's world - Obozo's EPA would have you in court and "aggressively prosecute!"

Cheers - Jim

It's not much of a paint job, but I sprayed the primer and green color on the car some years ago, right here in the garage, wore a mask, fumes were bad, but the breeze blowing through helped a LOT....

:loveletter:

EPA be looking at a 12 ga 00 buck......eff em....top of the list of .gov agencies that need killing off.....and it's a LONG list....

:smash::thumbs:
 
Last touches on the passenger side :

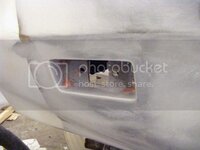
Sharpening of the rear side marker :
fenderflare96_zps51fe17e2.jpg

And glassing of the fender holes:
fenderflare99_zpsd21190b4.jpg


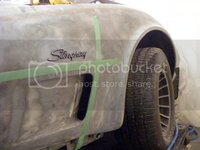
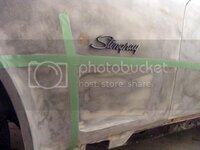
Also I decided to use the Stingray nameplate, to I reopened the holes:
fenderflare97_zps8b43c9f9.jpg

fenderflare98_zpsc7a73098.jpg
 
As an Amazon Associate we earn from qualifying purchases. Product prices and availability are accurate as of the date/time indicated and are subject to change.
All done, right?
Well, not so much.
Turns out my door didn't get misaligned, it's the striker pin that forces it downward. But the pin is already at its highest position.
Look like I'm gonna have to grin some metal to enlarge the window around the stricker pin backplate. *sight*
OTOH I found out realigning the door at that point is a breeze, the weatherstrip helps a lot. That's a good news, I'm more confident I can remove the door at paint time and recover the alignment afterward.
Actually the stricker pin alignment does a lot to the final door position.
 
I've been trying many thing to make my tail light special.
Afterall this is a very important detail as it may be the only thing many may see
crazy2.gif

So after all the led soldering, pcb hacking and such, I decided to start again from scratch.
The idea came for the little brainstorming I had will forum members about venting the rear bumper.

I watched a vid on the Challenger Hellcat, describing how they hollowed out one of the headlight to make room for supercharger intake that it all came clear to me.
I'm gonna do hollow taillights.

80-hollowtaillight3_zps9c63a268_58a84a05d2b49c8720b2f1e9a8c8a56f509696ab.jpg


80-hollowtaillight1_zps5b83ba7d_4c91c143eef09a49b44bd89466580a053d77bd86.jpg


80-hollowtaillight2_zpsf4d565d6_47bb7d92844645aa7b4cb535b6a757cb6533dd1e.jpg


LED rings are of the 'COB' style, as smooth as CCFL rings, and damn luminous.
The support is gonna be aluminum, and there will be a grid in the middle.

Another pretty massive news : I managed to find the suspension kit of my dreams : double mount VBnP monospring, front AND back.
I wanted it before that, but when experienced it in real life in Karsten's car, I was sold.
And this just as I was about to install longer TA bolt and cut front coil to put the car at its final stance. How timely!
I feel like Xmass before Xmass. :yahoo:
 
Last edited:
Glad you like it guys.
The piece that's going to support the rings it still in developpement, I'd like the three rings not to be on the same plane, but rather describe a inverted bubble shape, if you see what I means.
I will depends on what my machinist buddy is up to, I will see that with him this WE.
In the center I'm planning a honeycomb grid (I'm ordering it this evening).

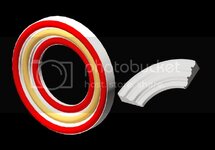
Here's a render of what I'm after :
hollowtaillight4_zps7afc83d9.jpg

I got to check on the car how I can fix them. The simpler would be 3 or 4 threaded hole around the side, but I need to confirm I can reach there to put the screws. I can't count on the venting hole as there will be a mesh already.
 
That's pretty cool stuff, I am surprised how much attention you pay to all this detail stuff - exact opposite to what I usually do at this stage.... I'd focus on on paint and then get the car on the road and worry about all that little crap later.....oh wait, then you end with a car without wipers or brake-lights (like mine) ..... :lol:

Today, after working on my house for weeks, I finally did some car related stuff again: oil change .... Took all of 15 minutes .... Lol ....
 
Good work. Tail lights are neat, but not for me. I think I'm going to widen my rear flares using variation of you technique.
 
That's pretty cool stuff, I am surprised how much attention you pay to all this detail stuff - exact opposite to what I usually do at this stage.... I'd focus on on paint and then get the car on the road and worry about all that little crap later.....oh wait, then you end with a car without wipers or brake-lights (like mine) ..... :lol:
Well, as long as you got someone to run behind the car with a can of starter spray, I see nothing wrong with that :rofl:

Good work. Tail lights are neat, but not for me. I think I'm going to widen my rear flares using variation of you technique.
It's ok, to each his own. Feel free to poke me about the flaring technique for more details.
 
Dropped by my machinist this morning, showed him the stuff, he likes the idea.
Here's a render of the laster iteration, I'm still playing with the shape as machining won't happen before a couple of days.
The grill is the actual grill, at its actual size.

80-hollowtaillight5_zpsf2d1d25e_590ef8c3e86dea185b9699d48913471083782505.jpg
 
Sweet

Considered making a few extras? Pricing improvements maybe - or looking to keep it really "one-off?"

Cheers Jim
 
Considered making a few extras? Pricing improvements maybe - or looking to keep it really "one-off?"

Cheers Jim
I'd be honored to have my work featured on someone else's car.
Be warned, it won't be cheap, only in LED I'm already 200$ in.
In the end it will depend of how much of the work you want to do yourself and how much my machinist is asking for more copies (mine are free :D).
 
is anything reflective so when the lights are off it can be seen by approaching headlights. i hate to see a situation someone wouldn't see you in time.
 
is anything reflective so when the lights are off it can be seen by approaching headlights. i hate to see a situation someone wouldn't see you in time.
Good question.
I dare to think so, the led rings are, as pic don't show, fairly transparent and they gonna seat in a groove that will be mirror polished, cast in clear epoxy.
 
is anything reflective so when the lights are off it can be seen by approaching headlights. i hate to see a situation someone wouldn't see you in time.

A certain number of square inches of reflectors are a legal requirement on back and sides and maybe front too.

(I sometimes think about mounting a 'slow vehicle' triangle reflector on the back of mine for fun.)
 
Since I had the 3D software up and running I took the time to pack together the existing mods (exhaust tips, flare and western wheels), with those coming (slanted window, hollow taillight) and those that are dreamed about (rear window louver).

hollowtaillight7_zps56e28762.jpg

This is what the back should look if I have all the time and resources I need this winter.
Note: current hood shape is irrelevant.
 
Maybe you should spend some design time on the center outlet hole. I get a feeling of a pipe stuck in to the middle of the light. Maybe design an outlet that looks more "machined" like some kind of radius or edge at the end of the outlet. It is probably beeing machined in a cnc machind so why not use the machines capability! You seem to have a great feeling for design so I'm sure you will get it right:thumbs:
 
Maybe you should spend some design time on the center outlet hole. I get a feeling of a pipe stuck in to the middle of the light. Maybe design an outlet that looks more "machined" like some kind of radius or edge at the end of the outlet. It is probably beeing machined in a cnc machind so why not use the machines capability! You seem to have a great feeling for design so I'm sure you will get it right:thumbs:

Well, that was the actual idea, like mini jet exhaust :blush: :gurney:.
To be frank when modeling the piece I didn't go down to the chamfers of each edge.
That's partly because the final process will be entirely hand-driven, no CNC, just an old machinist, his old lathe and whole bag of tricks.
But I hear you on that, in term of attention to details you're impossible to match, and I'm gonna do a couple of more 'finished' render for you to comment.
Thanks.
 
I'd take more Mondays like this one anytime!
Look what I brought from the border :

80-suspensionkit_zpsccd0b4e1_b9ec1e9350f2f2b0d33647a56b892a1a900196fc.jpg


VBnP double mount, front and back.
Plus a 2-way alarm system.
Can't wait to put those one....
 
You're going to like these springs !!!!!!

My advice: drive the car with steel springs first so you really can appreciate the difference these fiberglass springs make.....

I've always been a little worried about these breaking, using sidepipes and keeping the heat from the spring seems to give me the "warm and fuzzy" feeling..... :thumbs:
 
You're going to like these springs !!!!!!

My advice: drive the car with steel springs first so you really can appreciate the difference these fiberglass springs make.....

I've always been a little worried about these breaking, using sidepipes and keeping the heat from the spring seems to give me the "warm and fuzzy" feeling..... :thumbs:
Steel spring gone to the metal scraper long time ago, no turning back.
I was a little worried those being harsh, you car proved me wrong.
 
[
Steel spring gone to the metal scraper long time ago, no turning back.
I was a little worried those being harsh, you car proved me wrong.

Did I already have the front dual mount spring installed when you drove it? I remember I got the alignment done memorial day Monday (no wait, most people drinking at te beach) .... Alignment made a huge difference, now it's really fun to drive :)
 
[
Steel spring gone to the metal scraper long time ago, no turning back.
I was a little worried those being harsh, you car proved me wrong.

Did I already have the front dual mount spring installed when you drove it? I remember I got the alignment done memorial day Monday (no wait, most people drinking at te beach) .... Alignment made a huge difference, now it's really fun to drive :)
The front setup was still in the living room, but alignment was done, I remember the memorial day story.

But I still did see the difference, as I was initially only hoping to get a rear setup.
I never imagined I could ever get a deal on both.

Now the next question is, do I open another can of worm with the idea of raising the diff, because you know, whileImatitis.:twitch:
 
Back
Top