My '76 restoration (long post)

So, this Saturday, we finally did it, installing the windshield.
My trusty Jeff came to help, last time he was there that was for the front clip installation.
I don't request his help very often (he's a busy guy), but when I do that's when I need some super reliable helping hands.
Wasn't an easy task but we tackled it finally.
I'll happy with the spacing, trims are hugging the windshield pretty well.


80-windshield_20_206_20_20installed4_zpsgakajg9g_5569037eb192eb5a7af4ef577632e025b64af6c5.jpg


80-windshield_20_206_20_20installed3_zpspn2d70wj_ceac27b54b6e0d233647d96ec3f81fb2da1906fd.jpg


80-windshield_20_206_20_20installed2_zpsdfbfkilk_72219d189364425b05320122dc8e63e00eb321c5.jpg


80-windshield_20_206_20_20installed1_zpshlacejki_2ac6e553e6001e92773fdc58e14906f0c0ecb95d.jpg


80-windshield_20_206_20_20installed5_zpslrn2l14v_eb680d3a424015feec1402b053e2963e13fc3476.jpg


Next is a mod I had in mind for a while but only decided to make happen last week end. I had this indianapolis 500 steering wheel that came with the originally bought car, but it was bubba installed, with the tele locked in place with a regular screw.
I liked this steering wheel as is gives much more room for my legs, but I wanted the tele and stock horn button to remain.

80-custom_20steering_20wheel1_zpsfnjiyzdr_192fa281bc9987ca2cce7f9e9ef35c9c15de78f5.jpg


80-custom_20steering_20wheel2_zpsk2axsnsh_b817a718b739eec214900ece9f289fd25f3f153b.jpg


I know, I drilled much more holes than I should have.

80-custom_20steering_20wheel3_zps9civaxm7_928794079f8386ba37a6c9ecb1e43776d07755e9.jpg


Then I asked my machinist to machine the back of the tele lock ring to accommodate the steering wheel dish.

80-custom_20steering_20wheel4_zpsqqf3jnqr_921a6d76f5de88bd6151c4192be4ee34a6071717.jpg

It's pretty tight yet no interference, nice job Guy.
The steering wheel will received a custom leather wrap job eventually just like the stock one I restored.


And among all the little thing I'm taking care of while making the final assembly, I discovered that my front driver and back passenger inner fender had cracked bonding. I took care of it with the usual glue-a-penny-on-moon 3M bonding resin.

80-panel_20reglue2_zpsiaiinvdz_f4ea41cd63f8b3e6a878b17c69ac53a91db5496b.jpg


You'll notice I tried to stay faithful to the original built quality
rofl.gif

(Seriously the flash make is appear all weird, believe me it's way smoother than it seems).

80-panel_20reglue1_zpsfpn2kzs7_46295e9e0432fc8f37a0a9c6d43f909f5f9a9af2.jpg


The door panel are coming along, it's quiet a painfull process but I'll make it eventually, I'll make a dedicated update about that.

Now next big thing is tackling the gearbox leak. By that time the hub center/spinner tower hopefully are done, and to my understanding the car is technically roadworthy. not complete, but roadworthy.
 
You know, I speak English, American, Mexican, Spanish, French, and in all languages the first thing I learned were the idioms (wise sayings) then cuss words.... but merde alors, qu'est ce que c'est "glue a penny to the moon?" why would you do such a thing? is this something they do during the long winters in Quebec? :drink:
 
:crylol::gurney::drink:
You know, I speak English, American, Mexican, Spanish, French, and in all languages the first thing I learned were the idioms (wise sayings) then cuss words.... but merde alors, qu'est ce que c'est "glue a penny to the moon?" why would you do such a thing? is this something they do during the long winters in Quebec? :drink:
Hey, Sorry Aaron, I just didn't this those posts.
This I took this expression from a post Karsten made a while ago, might be a translation from a German expression. I liked it, it got stuck.
Tell us Karsten :sos:.


Doors are officially done, all complete. I installed the remote directly into the trim (it's actually bolted against the metal frame). I'm not big fan of the deluxe trim.

80-passenger_20done_zpsod1ydlxg_41de22ed52180a4839f2dd960257db4437ed13c9.jpg


Driver side have been a royal PITA. I ended up stripping the replacement panel from its plastic backing and transferred it into a vintage 76 backing. Took me a full week of gluing and stapling.
Passenger side replacement panel proved to be more in shape, hopefully.
80-driver_20finished_zps98ugpbkp_df17e8977a7ac27db19ff9114f131befbf5f80b1.jpg


I've also install the back quarter panels not before cutting out the part that relate to a window trim that's not here anymore. That's a "good for now" has I'll make some custom trim panel to accommodate my window mod. I manage to cut the backing but not the vinyl cover, as always flash makes it look all weird, IRL it's not that bad.

80-interior_20_2024_20_20rear_20trim_zpsjf1c9hog_e65c22e8ce2b2d3f849ae86c46c5502672d44865.jpg


Wheels are also entering they final stage

Sandblasted:

80-wheels5_zpsijvx4htd_a36d8ee442cc798ec9dd5f5f654514d0914b4d05.jpg


Polished, painted and clearcoated.
80-wheels6_zps5ztdafxn_eac93b6d5f3c149b0ba0b23abdfb0695b12e5bab.jpg


What the pic don't tell is that the rims have been machined in the back to match my bespoke spinner tower/hub centering ring. A lot the load on the bolts is transferred to the hub itself.

80-wheels9_zpsjeqykozh_03535a128bf31ef3ca4b2bdc8ac1cfa780039424.jpg


Many little stuff to take care of, like the hood rubber top seal.

80-hood_20rubber_20seal_zpstdlwyd6i_a6e2707bf3aa3943a538295ea3fc6b726154f909.jpg


Test fitting my fiero seat. Mike's seat cover will have to wait, I may have time but ain't got no money.

80-fiero_20seat_zpsxl4nvzqd_3e4f1760749919623108f2b9638d298f3af22b06.jpg


Right now I'm starting to put the transmission down, and waiting for my tires to get back from the tire shop.
 
Denis,

Do you perchance have a photo of the shoulder seat belt loop mount under the interior trim? As it is mounted to the car frame? My 73 has the shoulder belt through the seat which really limits me to what I can do for aftermarket seats. It also makes it a real pain in the ass to get behind the seats. I would like to do the loop like your model has and would like to see the stock set up.

Hey, it's looking real good, I am looking forward to seeing it come alive!

John
Thanks John.
I'm not sure I have a pic of the top loop mounting point, it's basically a thick plate with a threaded hole welded into the birdcage B-pillar.
Let me have a look at the AIM tonight.
 
Hey my friend.
You're right, it should be finished by now, except it's not.
I had kind of a rough time those last months, nothing compared to what some are getting through, but still enough to stall me on the project.
But worry not more as I'm getting back into the race, and to prove it, here's some updates.

I took the whole transmission out and fixed the leak. If I knew it was just a worn out speedo gear I wouldn't have, but I took it as an opportunity to check at the same time why my clutch pedal felt wrong.
So I took the whole flywheel/clutch assembly to my machinist to check if the clutch travel was correct, and it was.
After I put everything back together the pedal now feels normal, quiet baffling.
So all in all it was a good move.

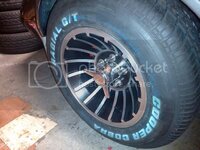
I also got my tires on :
wheelsdone6_zpsmz6ywe3r.jpg

Later on I scrubbed the blue coating off.

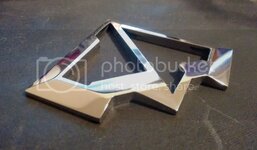
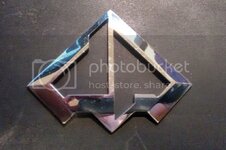
I also got my first emblem back from the machinist.
metal%20logo_zpsevzbczc5.jpg

metal%20logo2_zpsnl0jyx93.jpg
I did a quick polish round, but it will definitely get another one before final install. This one is the gas cap one.
I want the front one to match the angle of the hood, so it takes more time to get it machined out of the laser cut SS piece.

My last real ride stopper is the center gauge that I want computerized.
Most of the parts and code is there, but I have to piece it together and thoroughly test the whole system.
That is for the technical part of it, for the aesthetic part of it, I still can't speak as of now.
So here it is for now, still a lot for small detail to sort out. We'll see when it's done.
 
:bounce: NICE work man, looks GRAND.....must keep your OCD in order.....

I lean more to the compulsive side though.....:amazed:

but I looking at your post just now, those emblems....what is the significance of the design??

GENE
 
:bounce: NICE work man, looks GRAND.....must keep your OCD in order.....

I lean more to the compulsive side though.....:amazed:

but I looking at your post just now, those emblems....what is the significance of the design??

GENE
Thanks Gene.
First the logo has the overall shape of a B2 bomber, because that was the initial inspiration, stealthy, military.
Then the inner spells "DP", which both stand for my initials and the car name, which is "Dark Patrol".
The name is kinda off since I painted the car in a much lighter color than expected, but I just don't care.
I have a full script that would eventually replace the stingray side scripts, but first things first.
 
Some progress were made this weekend.
First I started to mock up my digital dash thing.

80-digitaldash_zpswztz1ebd_8ec51620165b61769518f746d6423a50611aed90.jpg


It's just a toying on a broken center console frame. I bought a complete one that already had the stereo area cut into when I'll move onto making the real thing. That way I don't feel guilty destroying an nice part.
I'm at the stage of making a support frame to keep the carputer fixed by the same hole the gauge cluster backing plate was using.
Obviously the final result will be much more smooth.

I also decided to tackle the rear window defroster installation.
Stressful process but turned out nice.


80-defroster_zps4psshou8_8c93f9a3a0a921bd4f24cce66fa20d3955bfe47a.jpg


Now installing a sunshade film, as I'd love to is gonna be a real PITA but I'll try nonetheless.
 
I just joined tonight and read your entire post in one sitting...and enjoyed it immensely. Its nice to see someone with the enthusiasm you have for your project. We are involved with a very similiar project..Corvettes are so needy :)
 
Hi everyone, it's been a while isn't it?
While I haven't been posting for a long time, sorry for that, I didn't give up on my project.
I just had many other side project requiring me and most of the work done on the car wasn't particulary worth posting.

I'm posting right now because I've reach a milestone : the car made it out of the garage, had a little run terrorizing the neighborhood and made to back under its own power. Sorry no vid or pic but next outing I promess I'll make one.
Took me forever to iron out all the little details, but everything but the engine is working great. The engine is still running rough, I know it has a pretty extreme cam but I tend to remember it running a bit more smoothly. I will probably have to check by a garage in Montreal specialized in carburated Hot-Rods. Or maybe it's because I have a spark wire with a different resistance that all the others. I hope you guys can give hints when I provide you a video of the engine running.

I had a couple of gremlins to chase, like this ground in the accessory 12v that forced me to put all the dashboard down twice. But it's ok I had to but it down one more time to route more wires.
The fuel pump I installed turned out to have a weakness in the membrane and quicky started puking fuel through the pump vent hole.... and the engine block. So no only I had to replace the pump, but also had to change the oil and the filter. Actually I'm gonna replace it again after I've done a couple of miles.
I'm pleased to report that the rebuilt T5 is working great. The very first time I tried to get to 3rd it kinda grinded, but at the second attempt it when through nicely.
Clutch feels just any other properly functioning manual car, steering with the borgeson in conjonction with my small radius steering wheel (tall person hack) feels very good, rather on the firm side, you better have both hand on the wheel, but doing parking manoeuvers while standing still is not heavy. It actually feel like an unassisted steering on a light car with narrow wheels, and I love that.
Hydroboost still feel unconsistent, but it is expected to have a rather mushy pedal feeling until air bubble leave the system but when good pressure is applied you're glad you have a seatbelt otherwise you'd be kissing (bitting?) the dashboard.
The ride allowed me to spot a couple of small issues like oil sweeping out of steering box return (now fixed) and a small leak at the base of the passenger valve cover (will do this WE).
I also had to raise the car 1/2" and put countersunk bolt at my transmission to crossmember adapter, otherwise I'd be grinding my garage entry asphalt. Since my garage ramp is pretty extreme, if I can get out of the garage I'm pretty sure to clear speedbumps.
The ride is harsh as hell, but it's rather Montreal abysmal road quality than the car setup that's to blame.

Now a couple picture of what's worth seeing:


When it turned out that it would be black widow or defroster, the defroster when into the bin. Goodbye practicality, hello look.

80-xxgglnn_871a245fd4087cbd4615611303e3d1ead5d39a2e.jpg


I installed grill below the front hood gills. I spent way too much time devising a clean way to get they installed nicely. After too much time spend on this I simply glued them.
80-saqqh7r_6e743ef51498cad0ba79cbbbccfc4cd34ba0bec7.jpg


80-wjql5tz_9b3446324c0af7e827bb9a7e9daaa57a1e34213d.jpg


My machinist buddy managed to machine the second emblem, the front one to my specification. Wasn't an easy job but it turned out just fantastic. The angle is spot on, I like how it hugs the crest of the body.

80-qg7t6vm_f96060ac4cb06aa1f989e96d4cbb5124edff7e06.jpg


80-kywulol_94a6ed3f47aa1dfa493b45b3cdc66a76a9e1a011.jpg


80-greifpy_02bbc31086a2d3cf6448afffcb5210706062898a.jpg


I also got the front DLR/flashed installed. One details I'm proud of is the fact the warning flashers works even when the car is off. It may sound simple but given the way those light work it wasn't
80-br288kr_ff25c7300526c1031d83f181b9bd2500771226e4.jpg


Installed is also the front "awareness" cameras. One on each side. When I go into first speed my center console computer displays both image side by side. Driving in town with a car you ride in the back seat required some visibility help.
80-mg3zpvb_af1e4c4d5b40d3c06d8a6a74c7dd49147964e148.jpg


80-sf8aifg_48f0d13f5f922ca1537a46c48e97f2fac5a559cf.jpg


It's displayed on that screen. I'm not going into much detail right now because :
1-It's not finished
2-It deserves a video
3-If I don't do it outside in natural light is gonna look like poo.

80-ialxpsx_671819615726ec219cfa638bef05eeb5f1d9b4f5.jpg


I ordered a set of new skin for my fiero seat from MrMike.
He was very great working with him. He made sure I understand all the degrees of freedom I could add to my cover, was willing to do a could of test run to get the perfect color combo for my emblem and the final result it nothing short of amazing. I went for black leather.
I haven't install the driver side, I sat directly on the floor for the test run.
80-91r69w9_fb1d046ae2f033baee5476cafe30d6ce7019f263.jpg


The stiching pattern is inspired my some Ferrari 430 seat pic I found on internet.
80-sxpgkpv_689b2dd6eff83215648a3ec47915765195504568.jpg


Custom logo
rock.gif

80-pdnbehn_bbbd9fd078cfdccd48c721abd41ccb1c86a33c30.jpg


One last job was the center console. Climate control is still in disarray and the cover is not even fixed, but I took time to customize what was the ashtray.
80-cbrmyln_b1764bc7c6f105eb2552684ccbb94f0337e56272.jpg


Now the trap hides a regular light plug plus 2 usb charging ports.
80-wtbwcvu_106fdbdcf74b69edd871eb79a25a8e5d413a0971.jpg
 
Top