Long Overdue Progress! Doors Finished 3/17/26

VetteMod - Corvette Restoration, Modding & Performance Forum

Help Support VetteMod Forum:

That is going to need a new hood!

Excellent work. And gorgeous. I am having a shock/spring interference problem now with my new wheel/tire combo. I am once again, stuck in an engineering mode. Am seriously - very seriously considering a pushrod setup on the IRS. Not much stock left anyway.

Best of luck on your mod.

Cheers - Jim
 
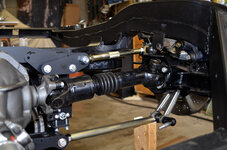
I am using a standard based suspension with an upper control arm added and slip halfshafts with a VPB Dual Mount spring.
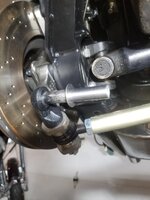
4618bdcfbd2e7a.jpg

So the positions of the upper shock mount and the lower shock mount are stock as is the position of the trailing arm (or within ¼ inch of stock).

PROBLEM #1 – With the shock mounted in the upper mount and allowed to “hang” in the position established by the top mount, I will need to force the bottom of the shock OVER 1 ¼ inches. This takes about 15ft/lbs of force on the body of the shock to do this. This offset only gets worse with the shock at ride height (shown at full droop).
However because of the shock mounts, it is relatively free to rotate front to back. That is what I don’t get. The front shock has a upper mount that does not restrict the body of the shock at all. It’s basically a 360 degree swivel. BUT the front suspension only pivots in 1 plane and the rear suspension rotates in a plane defined by the trailing arm pivot and also rotates in another plane (90 degrees to it) defined by the control rods. BUT the rear shock only has freedom to operate in one plane.
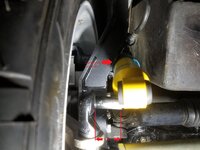
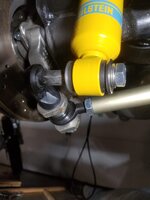
4618bdc4e04ef7.jpg

PROBLEM #2 – If the shock were to be moved over 1 ¼ inches so that you could attach it to the lower mount, the trailing arm would interfere with the shock body by about ¾ inch.

SOLUTION? – I am thinking that I will machine an adapter to re-locate the lower mount position (inward to the center of the car) 1 ¼ inches. This will offset the shock absorber loads on the lower mount and could be an issue based on the dynamic load on the shock. I am going to work though that in the next few days.

But the question remains, why is my car different (shock mounting) than others? Or is it?

 
my first question is 'have you aligned the toe yet?'

that said, with the aftermarket parts there, I can imagine some fitting might be required. When I helped someone with their ridetech kit, it relocated the shock mounts to below the trailing arm - however, it also put the upper mount at the pinion.
tJeotHth.jpg
It will take some looking to find a sharkbite kit - but it's similar concept.
I'm afraid that if you move the leverage point out on the shock mount, that it will cause twisting problems...
 
I am using a standard based suspension with an upper control arm added and slip halfshafts with a VPB Dual Mount spring.

4618bdcfbd2e7a.jpg

So the positions of the upper shock mount and the lower shock mount are stock as is the position of the trailing arm (or within ¼ inch of stock).

PROBLEM #1 – With the shock mounted in the upper mount and allowed to “hang” in the position established by the top mount, I will need to force the bottom of the shock OVER 1 ¼ inches. This takes about 15ft/lbs of force on the body of the shock to do this. This offset only gets worse with the shock at ride height (shown at full droop).
However because of the shock mounts, it is relatively free to rotate front to back. That is what I don’t get. The front shock has a upper mount that does not restrict the body of the shock at all. It’s basically a 360 degree swivel. BUT the front suspension only pivots in 1 plane and the rear suspension rotates in a plane defined by the trailing arm pivot and also rotates in another plane (90 degrees to it) defined by the control rods. BUT the rear shock only has freedom to operate in one plane.

4618bdc4e04ef7.jpg

PROBLEM #2 – If the shock were to be moved over 1 ¼ inches so that you could attach it to the lower mount, the trailing arm would interfere with the shock body by about ¾ inch.

SOLUTION? – I am thinking that I will machine an adapter to re-locate the lower mount position (inward to the center of the car) 1 ¼ inches. This will offset the shock absorber loads on the lower mount and could be an issue based on the dynamic load on the shock. I am going to work though that in the next few days.

But the question remains, why is my car different (shock mounting) than others? Or is it?

There are a lot of shocks with spherical bearings on each end to allow compliance in multiple directions. If you are committed to the shocks you have, you might be able to press the rubber bushings out and press in spherical bearings.
 
my first question is 'have you aligned the toe yet?'

that said, with the aftermarket parts there, I can imagine some fitting might be required. When I helped someone with their ridetech kit, it relocated the shock mounts to below the trailing arm - however, it also put the upper mount at the pinion.
tJeotHth.jpg
It will take some looking to find a sharkbite kit - but it's similar concept.
I'm afraid that if you move the leverage point out on the shock mount, that it will cause twisting problems...

Yes, the car is aligned at ride height.

The twist on the lower mount is concerning but I'm not convinced that the moment is that great. If you assume that the dynamic load on the shock is limited by the spring (rate) and you make an assumption that the dynamic load on the shock absorber is some fraction of the spring rate, the force is probably pretty low. So, if the spring provides 500lbs/in and the damping rate is 50% of that, it's manageable. I think the actual damping rate is less than that.
 
I am using a standard based suspension with an upper control arm added and slip halfshafts with a VPB Dual Mount spring.

4618bdcfbd2e7a.jpg

So the positions of the upper shock mount and the lower shock mount are stock as is the position of the trailing arm (or within ¼ inch of stock).

PROBLEM #1 – With the shock mounted in the upper mount and allowed to “hang” in the position established by the top mount, I will need to force the bottom of the shock OVER 1 ¼ inches. This takes about 15ft/lbs of force on the body of the shock to do this. This offset only gets worse with the shock at ride height (shown at full droop).
However because of the shock mounts, it is relatively free to rotate front to back. That is what I don’t get. The front shock has a upper mount that does not restrict the body of the shock at all. It’s basically a 360 degree swivel. BUT the front suspension only pivots in 1 plane and the rear suspension rotates in a plane defined by the trailing arm pivot and also rotates in another plane (90 degrees to it) defined by the control rods. BUT the rear shock only has freedom to operate in one plane.

4618bdc4e04ef7.jpg

PROBLEM #2 – If the shock were to be moved over 1 ¼ inches so that you could attach it to the lower mount, the trailing arm would interfere with the shock body by about ¾ inch.

SOLUTION? – I am thinking that I will machine an adapter to re-locate the lower mount position (inward to the center of the car) 1 ¼ inches. This will offset the shock absorber loads on the lower mount and could be an issue based on the dynamic load on the shock. I am going to work though that in the next few days.

But the question remains, why is my car different (shock mounting) than others? Or is it?

There are a lot of shocks with spherical bearings on each end to allow compliance in multiple directions. If you are committed to the shocks you have, you might be able to press the rubber bushings out and press in spherical bearings.

I have looked at some spherical bushings but haven't found one that will fit, that doesn't mean they aren't made. Maybe some kind of mini Johnny Joint?
 
As an Amazon Associate we earn from qualifying purchases. Product prices and availability are accurate as of the date/time indicated and are subject to change.
...........................
I have looked at some spherical bushings but haven't found one that will fit, that doesn't mean they aren't made. Maybe some kind of mini Johnny Joint?

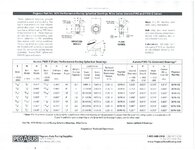
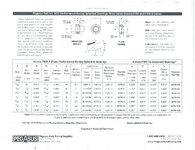
I've been looking for a similar bushing setup for the past couple years and have struck out. Keep us updated if the parts on that Pegasus list ends up doing the trick.
 
I've got an old set of AFCO steel body shocks, and I noticed they have bearings that can be removed, so I looked them up. Here is a link to one of the available bearings with an outside diameter of about 1". You might be able to remove the rubber bushings, hone or sleeve the inside diameter to the right size, and machine for retainer clips or just tack weld a retainer ring to hold it in.

https://www.afcoracing.com/store.aspx?itemid=3336&prodid=20169&pagetitle=Shock-Bearing-And-Clip-
 
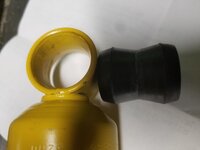
Took the bushing out and the inside bore is tapered like an hourglass.

46191aecc50c63.jpg

It is not optimal but, if I use the bushings as is, extend the lower mount and install without side load at ride height, I should be OK. I need to stop making a project out of everything with this car :banghead:

The next issue is raising the spring mounts so that I can lower the rear 1 inch. I can't get to ride height with them as is. My next project.
 
Thought I would take a look at C4 rear shocks to see if this had been corrected. The shocks are the same but the top mount is turned 90 degrees from the bottom mount:

C4-Suspension-Service-23-Medium.jpg

C4-Suspension-Service-19-Medium.jpg
 
You might be able to lower the car with longer bolts. I used C4 spring bolts as it seems all the repop hd springs have too much arch. They are pretty cheap compared to ordering grade 8 bolts if I remember correctly.

You might find a shock with just a thin lower rod that will fix your clearance issue. That might be easier in the long run.

Just a random pick, but something like this https://www.speedwaymotors.com/Bils...wxbC_Woj6rdiq8eFeIxQZOj9LGHELIBhoCW-kQAvD_BwE


I seem to remember with Tom’s offset ta’s, I disconnected the spring and put the ta on blocks. After clearancing 1/8 in I was able to wiggle them in from the backside of the lower mount. Your photo shows them on the front side of the mount where it is a lot tighter.

Just my 2 cents.
 
Last edited:
You might be able to lower the car with longer bolts. I used C4 spring bolts as it seems all the repop hd springs have too much arch. They are pretty cheap compared to ordering grade 8 bolts if I remember correctly.

You might find a shock with just a thin lower rod that will fix your clearance issue. That might be easier in the long run.

Just a random pick, but something like this https://www.speedwaymotors.com/Bils...wxbC_Woj6rdiq8eFeIxQZOj9LGHELIBhoCW-kQAvD_BwE

I seem to remember with Tom’s offset ta’s, I disconnected the spring and put the ta on blocks. After clearancing 1/8 in I was able to wiggle them in from the backside of the lower mount. Your photo shows them on the front side of the mount where it is a lot tighter.

Just my 2 cents.

The bolts I have are 8" long. I'm good in the front but the rear (at ride height) is too close to the rim. So raising the spring is my only option.
 
You might be able to lower the car with longer bolts. I used C4 spring bolts as it seems all the repop hd springs have too much arch. They are pretty cheap compared to ordering grade 8 bolts if I remember correctly.

You might find a shock with just a thin lower rod that will fix your clearance issue. That might be easier in the long run.

Just a random pick, but something like this https://www.speedwaymotors.com/Bils...wxbC_Woj6rdiq8eFeIxQZOj9LGHELIBhoCW-kQAvD_BwE

I seem to remember with Tom’s offset ta’s, I disconnected the spring and put the ta on blocks. After clearancing 1/8 in I was able to wiggle them in from the backside of the lower mount. Your photo shows them on the front side of the mount where it is a lot tighter.

Just my 2 cents.

The bolts I have are 8" long. I'm good in the front but the rear (at ride height) is too close to the rim. So raising the spring is my only option.

Okay, hard to visualize.
 
You might be able to lower the car with longer bolts. I used C4 spring bolts as it seems all the repop hd springs have too much arch. They are pretty cheap compared to ordering grade 8 bolts if I remember correctly.

You might find a shock with just a thin lower rod that will fix your clearance issue. That might be easier in the long run.

Just a random pick, but something like this https://www.speedwaymotors.com/Bils...wxbC_Woj6rdiq8eFeIxQZOj9LGHELIBhoCW-kQAvD_BwE

I seem to remember with Tom’s offset ta’s, I disconnected the spring and put the ta on blocks. After clearancing 1/8 in I was able to wiggle them in from the backside of the lower mount. Your photo shows them on the front side of the mount where it is a lot tighter.

Just my 2 cents.

The bolts I have are 8" long. I'm good in the front but the rear (at ride height) is too close to the rim. So raising the spring is my only option.

Okay, hard to visualize.

the 'cheap' way of fixing the spring width is cut 2" off, move the lower spring over, redrill the centering hole and drill a new bolt hole. The stock C3 spring is in the way of wider wheels - so even if you use offset trailing arms or relocate the e-brake brackets, the spring will hit the rim - this is especially true if you lower the car with longer bolts.
 
That works with a steel spring. I have a composite spring.

I can raise the spring 1" by making new mounts. That's next.

item_40586.jpg
 
Thinking more about this, I might have installed the shocks before the half shafts and lower link. It was a puzzle for sure, but I see I only trimmed off 1/8 in. I have similar shocks to yours. I did trim the blue rubber boot.
 
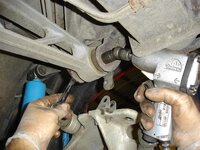
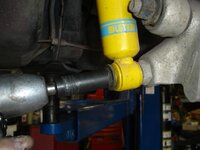
I finally have the shocks installed. I made a 1/2-20 threaded sleeve that threads onto the lower mount. This centered the shock on the mount and clearance between the shock and everything else is good.

Now to fix the spring mount issue.

As is:
4619fb44cc791a.jpg

Sleeve Installed
4619fb44ca9d4a.jpg

Shock Installed
4619fb44c8cfa2.jpg
 
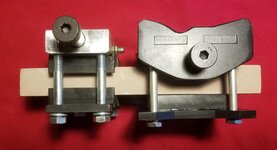
I was able to move the spring mount pivot down about 1" by making new brackets. Old VBP mount on the left and new on right. This moves the spring UP an 1" and also moves the end of the spring UP 1" and gives me clearance to the inside of the wheel. It was maybe 1/8" clearance before.......not good.


461b27b448d4eb.jpg

item_40586.jpg
 
Uh-oh. Started the car to do some tuning and it wasn't running right. Rough idle, etc. I tried to adjust the IAC but I was doing it blind because you don't see sensor values until temp reaches 160 (Holley HP EFI). So eventually the car stalled an wouldn't re-start.

I check for spark-OK. Checked the fuel rail for pressure and got 8psi! Looks like I found a new project.

Good news is that I got the rear spring in. So, one step forward and one step back.
 
bypass fuel system or deadhead? if bypass, check the regulator first.... don't ask me why I suggest this because I still say bad words about it.
 
Uh-oh. Started the car to do some tuning and it wasn't running right. Rough idle, etc. I tried to adjust the IAC but I was doing it blind because you don't see sensor values until temp reaches 160 (Holley HP EFI). So eventually the car stalled an wouldn't re-start.

I check for spark-OK. Checked the fuel rail for pressure and got 8psi! Looks like I found a new project.

Good news is that I got the rear spring in. So, one step forward and one step back.


Trying to find the problem and started with checking pressure at the pump (line going into the filter). Deadheaded, the pressure is 10psi. Not good

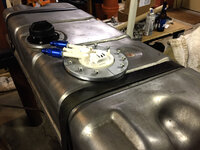
I have an in tank pump so now I will need to remove the exhaust and drop the tank. Also not good

45b21843151980.jpg

This is a brand new Delphi pump that has minutes of run time on it. I have one of these in my 97 Tahoe. It's the factory pump 25 years later!

However, on the bright side, the car is sitting on it's wheels (no jack stands) for the first time in ~15 years.
 
Okay, I've got a guess. I had this happen to me on my 99 Tahoe a few months ago. I had low pressure (8 psi) so I changed the pump (new Delphi). I reused the semi flexible connector between the pump and the discharge tube. It looked fine, and the new pump had a hard rubber connector that was a little small for the tube size. I still only had 8 psi, so I dropped the tank again. It took me a while to find it, but the connector had a small slit on the inside diameter that you could not see from the outside. It was dumping the pressure. Changed the connector and the problem was solved. You may not have exactly the same problem, but I would check the connection between the pump and the discharge tube (above the pump) for any possible leaks or sealing problems. Good luck.
 
Last edited:
That's probably it, an internal leak. The motor sounds like it always did (it runs for 5 seconds before starting). I will work on removing the tank this weekend.

When I bought the pump, I did a lot of checking because I didn't want to drop the tank because I bought a cheap pump. The Delphi pump was recommended and it was expensive. Maybe I will look for a NOS GM pump.
 
OK. Got the engine started and a redo of all the engine parameters and basic tune for the fuel injection. The suspension is complete except for ride height (it's close). I need to re-hang the exhaust and some other minor stuff but it's basically drivable.

Next will be the interior and I need to troubleshoot an engine noise that sounds like a valve lash issue.
 
OK. Got the engine started and a redo of all the engine parameters and basic tune for the fuel injection. The suspension is complete except for ride height (it's close). I need to re-hang the exhaust and some other minor stuff but it's basically drivable.

Next will be the interior and I need to troubleshoot an engine noise that sounds like a valve lash issue.

Excellent!
 
Back
Top