You are using an out of date browser. It may not display this or other websites correctly.
You should upgrade or use an alternative browser.
You should upgrade or use an alternative browser.
Carbon Fiber body parts
- Thread starter gabbett1
- Start date
Help Support VetteMod Forum:

phantomjock
Well-known member
Just wondering - are you planning on re-enforcing the molds with any timber - etc to keep it rigid and maintain shape once you pull it off you "plug"?
I'm getting ready to do some flares and plan on using foam "noodles" (like at the pool) and glass those to the mold to keep it stable when I separate.
Cheers - Jim
I'm getting ready to do some flares and plan on using foam "noodles" (like at the pool) and glass those to the mold to keep it stable when I separate.
Cheers - Jim
Just wondering - are you planning on re-enforcing the molds with any timber - etc to keep it rigid and maintain shape once you pull it off you "plug"?
I'm getting ready to do some flares and plan on using foam "noodles" (like at the pool) and glass those to the mold to keep it stable when I separate.
Cheers - Jim
The complete molding system I went with does not specify to use anything like what you are suggesting. It's purely gel coat, then fiberglass reinforcement.
phantomjock
Well-known member
Sounds interesting - pm if you wouldn't mind sharing the details of that system.
EasyComposites have some really good "How to's" on Youtube.
https://www.youtube.com/watch?v=UgKvDw1E60E
https://www.youtube.com/watch?v=UgKvDw1E60E


![Pampers Sensitive Baby Wipes, Clinically Proven, Fragrance Free, Unscented, Water Based, Hypoallergenic, Multi-Use, Hand Wipes 336 Wipes Total (6X Flip-Top Packs) [Packaging May Vary]](https://m.media-amazon.com/images/I/41KLBHu9CAL._SL500_.jpg)


As an Amazon Associate we earn from qualifying purchases. Product prices and availability are accurate as of the date/time indicated and are subject to change.
EasyComposites have some really good "How to's" on Youtube.
https://www.youtube.com/watch?v=UgKvDw1E60E
Yep, that's how I got started being interested in this project really. Well, at least as far as making it happen. I've always wanted to get CF parts for my vettes. They make it look a lot easier than it is though, lol. It's a lot of work.
Ok... It's been a long and tiring last week but I have some updates.
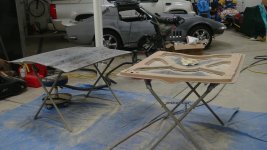
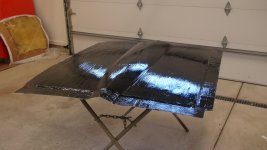
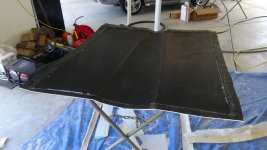
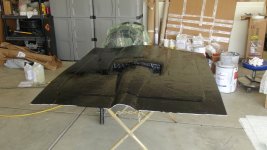
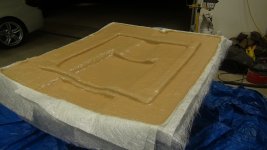
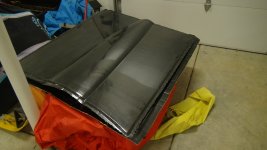
Got the first hood molded and separated. Had some minor issues but nothing we can't work with I don't think. Worst case, we take what we've learned and re-mold. Here are some pics.
Got the first hood molded and separated. Had some minor issues but nothing we can't work with I don't think. Worst case, we take what we've learned and re-mold. Here are some pics.
Attachments

Well, it's been a trying week this week. We had one hood ready to infuse and couldn't find all of the leaks in our vacuum bag. The only other thing to do at that point is to re-bag but we didn't have enough bagging material. I'm getting tired of waiting for supplies to come in...
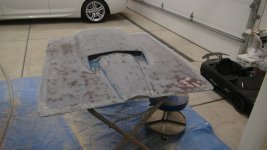
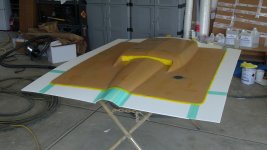
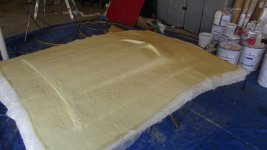
We did prep the '67 BB hood for molding and began the process today.
We did prep the '67 BB hood for molding and began the process today.
Attachments

phantomjock
Well-known member
That SUX - NOT!
I use Joe the Woodworker. He specializes in vacuum supplies for veneer work. Has some specials on occasion. And ships pretty fast too.
I also just bought a new vacuum tap/port from US Composites. It is a silicone fitting that should guarantee a better seal at the port. I've always struggled for that leak.
I've been using the yellow vacuum seal tape - and often back it up with 2 inch wide blue 3m painters tape. I'm going to build a table and frame - Joe has plans on his web site. Useful for large flat pieces - think hoods?
Cheers - Jim
Finally infused our first hood today! I know it won't be perfect since it's the first one, but I'm excited to get it out of the mold tomorrow evening and see how it came out. Look for photo updates after 8pm tomorrow.
:yahoo:
:yahoo:
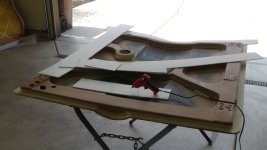
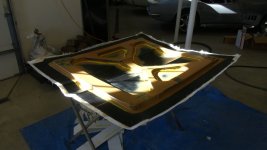
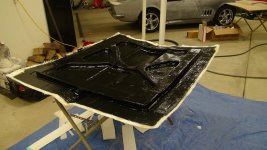
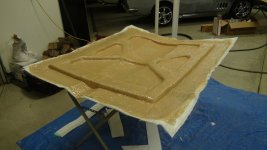
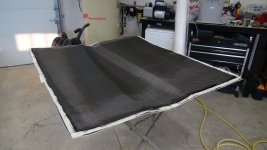
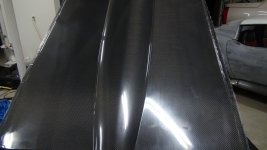
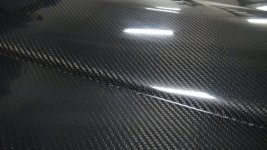
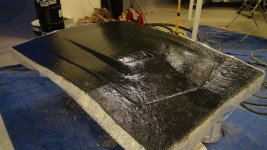
Ok! Lots going on this evening. Finished molding the '67 BB hood and also pulled my first carbon part! It actually came out much better than I expected. It's still not something I'd probably sell to someone but it looks damn good for my first try. Check it out for yourself.
Attachments
phantomjock
Well-known member
Congratulations! Learning heaps I imagine.
I have 78 rockers and Pace Car front spoiler if you need them. PM here.
Cheers - Jim
I have 78 rockers and Pace Car front spoiler if you need them. PM here.
Cheers - Jim
Congratulations! Learning heaps I imagine.
I have 78 rockers and Pace Car front spoiler if you need them. PM here.
Cheers - Jim
Yes, learning a lot. Already know a few things I'd do differently next time.
Kid Vette
Master-Baiter
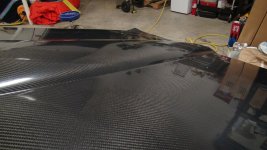
Looks nice! But how come it looks like a big block hood on the inside but a small block hood on the outside?
Looks nice! But how come it looks like a big block hood on the inside but a small block hood on the outside?
I think you are confusing the bb hood mold and the small block hood I made out of carbon. I didn't show any pictures of the carbon hood underside.
Had a bit of a setback. Infused the BB hood and the bag created over a dozen leaks in it so it ruined the part. I tried out a new bagging material on it and needless to say, I won't be using that one again. It created a perfect vacuum and drop test but once we started to infuse it created pinholes.
phantomjock
Well-known member
Man - that (doesn't) SUCK!
Hope it wasn't this from USComposites:

I have a boatload of it!
Cheers - Jim
Hope it wasn't this from USComposites:
I have a boatload of it!
Cheers - Jim
Well, after getting two parts ruined from leaks in the bag I finally discovered that the bag material I was using and the resin I was using was incompatible. I didn't know that was even possible but again, lesson learned. Now I'm waiting on more fabric to show up so I can make my part.
phantomjock
Well-known member
"Under Pressure..."
Nothing like a deadline to get you moving eh? No pressure there! I'm not nearly ready for this year - it will be next - unless I trash it on the track next season..
Cheers - Jim
Nothing like a deadline to get you moving eh? No pressure there! I'm not nearly ready for this year - it will be next - unless I trash it on the track next season..
Cheers - Jim
Nothing like a deadline to get you moving eh? No pressure there! I'm not nearly ready for this year - it will be next - unless I trash it on the track next season..
Cheers - Jim
No kidding! Of course today is going to set me back quite a bit... I got a phone call last night that I have to fly to Tennessee to pick up my sister in law and her daughters. That's going to be 4 ours of the day that I can't get back...
rtj
Well-known member
- Joined
- Nov 5, 2011
- Messages
- 3,598
- Reaction score
- 211
I was part of a small group that built vehicles a long time ago. And the guys doing molds and bodies, found that they had to keep the first coat of gel coat to a certain thickness or the body would be blemished when pulled. They used a thickness gage to check while it was wet. Don't know if that's any help to you but something to consider.
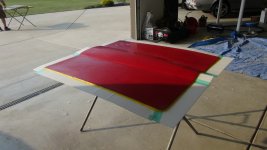
Just a quick update, I've been gone quite a bit and haven't been able to get much work done. Currently though we are working on rocker panels for both C2 and C3 vettes. It appears that one set fits all, even though some years have different designs, they all appear to fit one another so, one set of CF rockers should fit all years and if they are going to be CF then there shouldn't be any need to make multiple molds of different styles.
Edit: Just wanted to make it clear. One set of C2 rockers fit all C2 cars and one set of C3 rockers fits all C3 cars... Hopefully, lol.
Edit: Just wanted to make it clear. One set of C2 rockers fit all C2 cars and one set of C3 rockers fits all C3 cars... Hopefully, lol.
So I have some rocker panels I'm getting ready to mold but I'm trying to decide what to do with the tabs. It would be a ton easier to not include the tabs with the part, but I'm not sure how critical the tabs are.
So that is my question. How important are the tabs on the rocker panels? Are they necessary or can you get by without them?
So that is my question. How important are the tabs on the rocker panels? Are they necessary or can you get by without them?
Similar threads
- Replies
- 3
- Views
- 1K
- Replies
- 6
- Views
- 2K
- Replies
- 1
- Views
- 764