General Information
I can't believe how out of date I've let this garage become. Thought I'd spend a few minutes this morning updating it. The first part describes when I first got the car and the first motor that I put in. The second is a description of what went wrong (twice) and where I'm at now.
History: I bought the car early in 2007 in Costa Mesa California. I had an 81 at the time but was looking for something with a little more potential and more options to tinker with the engine. In California, all cars 75 and earlier are smog exempt so you have a little more latitude.
In any case, this car suited my purposes well. It had been redone inside and repainted. It also had an NOM engine that was ready for the garbage. The starter boss on the block was badly split. It had been welded a couple of times and looked it. We agreed on a price and up it came!
I drove it briefly with a steel c-clamp holding the starter in place but then decided that I could do better.
The Saga: Much of this has been captured elsewhere, but since many of the folks on this site helped me through the ordeal, I wanted to capture it here.
On break in, I found that the engine leaked a fair bit of oil. TimAT helped me through the rear main seal repair. Turned out, they never installed one when the rebuilt the engine.
Also on break in, I had a lot of trouble with the car overheating. I assumed that it was mostly due to lack of air flow through the rad. Turned out the rad was original and choked with goo.
The car came with a high performance HEI without a vacuum advance. I stupidly set it at stock 4 degree advance. Bird told me I was stupid and suggested 16 degrees to start. That brought the temp down significantly. It now has a DeWitts rad and external tranny cooler. that should help the temps stay down as well.
On my first drive after the engine break in, I found that the brakes were spongey. Pulled the backs off and found the following: Parking brake hardware from the passenger side completely missing, front and back rotors switched on the driver's side (each now has a groove on opposite sides of the rotor), both rear calipers missing inner bleed screws and the castings were damaged so that when I put screws in, they leaked. Did you know you have to remove the spindle and, as a result, replace the rear bearings to replace the parking brake hardware?
After rebuilding or replacing all the calipers, I found that the brakes were still spongey. Master cylinder, I would guess. Went to remove that only to find that the brake booster has been buggered up. Dang.
Car has a really cool set of air horns that never worked. Maybe because they were disconnected. Dang, they're loud!
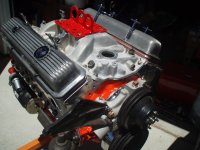
The Plan: After much consternation and searching, I finally settled on a 400 small block as the replacement engine. In brief, it is set up as a low end focussed torque monster that should run well on pump gas. Desktop dyno says it will REALLY fall off in power after 5000 RPM, mostly because of the intake but also because of the small runner heads, but that suits my use just fine.
Engine Specifications:
400 Small block, bored 30 over (406)
509 block (2 bolt mains)
Edelbrock Performer RPM 170 cc aluminum heads
dished (-12.5cc) stock type pistons and stock rods
SCR 10.1:1
Never did a DCR calc
Edelbrock Performer intake
Full roller rockers (1.52:1)
Q-jet carb, rebuilt and tuned by Lars
Stewart high flow, aluminum water pump
Mellings standard flow and pressure oil pump
TH400 tranny
308 rear end
True dual exhaust
Lunati 60103LK cam
What happened next: I drove the car fo a short period of time with the engine above. I had a number of incidents where the car nearly or completely overheated. I attributed this to the hydroboost unit sticking with the brakes on and inadequate cooling as a result of not running the full fan shroud and foam seals. As a result (I thought) of the overheating the motor developed a very significant shake that got significantly worse over time. I assumed that I had done damage as a result of overheating. On pulling the engine for replacement I discovered that several of the rockers had come loose but by then I had already prepared the new motor that was ready for instalation which I went ahead and did. While it was out, I sold the 400 and the heads both of which turned out to work fine.
Hydroboost repair: The problem was that the brake pedal wouldn't return all the way after depressing the pedal. The hydroboost was strong enough that it would hold the car at idle with this pedal hitch. Again, this is written up in detail elsewhere on this forum but the long and short was that the brake pushrod was on the wrong pedal hole. I switched the hole to which the clevis was attached, added a new brake light strike plate and presto; problem solved!
The stroker: After I thought I had killed the 400, I found an add on Craigslist for a stroker that struck me as an interesting project. The guy was an engine builder nad had assembled all of the parts for a stroker, including a machined block, for his vette. He had run into financial trouble and needed to make rent so I bought the whole kit complete. This included:
73 vette 4 bolt block bored 30 over and clearanced for a stroker crank (needed a little more clearancing when assembled)
Scat 4340 crank
Speed pro hypereutectic pistons
Scat forged rods
Total Seal TS1 rings (gapless second ring)
Nice SFI flexplate
Old, painted damper (what was he thinking?)
Dart Platinum Pro Iron Eagle heads with 72 cc chambers
Manley Stainless valves
Cheepo aluminum roller rockers
Vic Junior intake (which I did not use)
Moroso aluminum water pump
New mellings oil pump (HV)
To this I added a custom grind solid roller cam from Comp:
Comp cam retro solid roller lifters
A custom fitted windage tray (freaking nightmare that was)
Custom dented stock oil pan to accommodate the windage tray.
ARP bolts and main studs to match
Cloyes 2 piece aluminum roller timing cover
The result: Truly the best motor I have ever had the pleasure of driving. To torque was insane. I could spin the wheels at any speed. Pin you back in the seat acceleration. Superb top end. Finally I was happy with an engine.
The saga continues
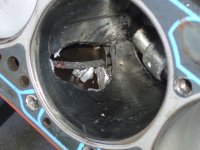
I've written up the next stage of the saga elsewhere on this forum. The long and short is that one of the pistons blew up for reasons yet unknown (could be floating pin clips or maybe detonation with hypereutectic pistons). When it blew, or more accurately locked up, I was only a half block from home so I was able to coast into my driveway where it sits this morning. I only include one picture here which should tell the story.
Now
While I decide what the next engine will be and assemble the parts, I picked up a cheep, used GM replacement engine so that I can drive the car in the interim. That will go in this morning.
What's next?
Good question. After feeling the power of the stroker, I don't think I want any less than that. The plan all along was to learn from a fairly conventional stoker buildup and then work on a big inch small block build. Grenading a motor wasn't part of the plan, but it happens. In any case, that is the path that I currently am planning. In my mind right now, I plan to pick up a Dart Sportsman block with 350 mains and 4.125 bore. My crank and rods are perfect (replaced the bent rod) so I plan to reuse them. Part of the rational is that while I did plan a larger CI small block the stroke longer than 3.75 seems to create the need for a number of higher priced components for clearance sake. My cam is already a small base circle one but obviously the rods wouldn't work. I suppose I can always change my mind later. That has happened before.
Yet to do: 200 4R conversion (I have the tranny and parts, not the time)
Hydroboost (done 16 AUG 2008))
Refurbish shoulder belts (Replaced 2010)
Body mount replacement
Sidepipes (completed 12 FEB 2011)
Replace soft top (old one installed by untrained monkey)
Repair/replace stereo (Repaired DEC 2010)
Repair rust in birdcage behind kick panel (Repaired NOV 2010)
Replace engine wiring harness (done 27 JUL 2008)
Replace dash wiring harness
High beam headlight upgrade (landing lights)
Repair heater
Refurbish A/C system
Find out why end play so bad on differential
Change 73 oil pressure gauge to electric sender unit
Change clock to tranny or engine oil temperature
Damn, I never should have started this list.
History: I bought the car early in 2007 in Costa Mesa California. I had an 81 at the time but was looking for something with a little more potential and more options to tinker with the engine. In California, all cars 75 and earlier are smog exempt so you have a little more latitude.
In any case, this car suited my purposes well. It had been redone inside and repainted. It also had an NOM engine that was ready for the garbage. The starter boss on the block was badly split. It had been welded a couple of times and looked it. We agreed on a price and up it came!
I drove it briefly with a steel c-clamp holding the starter in place but then decided that I could do better.
The Saga: Much of this has been captured elsewhere, but since many of the folks on this site helped me through the ordeal, I wanted to capture it here.
On break in, I found that the engine leaked a fair bit of oil. TimAT helped me through the rear main seal repair. Turned out, they never installed one when the rebuilt the engine.
Also on break in, I had a lot of trouble with the car overheating. I assumed that it was mostly due to lack of air flow through the rad. Turned out the rad was original and choked with goo.
The car came with a high performance HEI without a vacuum advance. I stupidly set it at stock 4 degree advance. Bird told me I was stupid and suggested 16 degrees to start. That brought the temp down significantly. It now has a DeWitts rad and external tranny cooler. that should help the temps stay down as well.
On my first drive after the engine break in, I found that the brakes were spongey. Pulled the backs off and found the following: Parking brake hardware from the passenger side completely missing, front and back rotors switched on the driver's side (each now has a groove on opposite sides of the rotor), both rear calipers missing inner bleed screws and the castings were damaged so that when I put screws in, they leaked. Did you know you have to remove the spindle and, as a result, replace the rear bearings to replace the parking brake hardware?
After rebuilding or replacing all the calipers, I found that the brakes were still spongey. Master cylinder, I would guess. Went to remove that only to find that the brake booster has been buggered up. Dang.
Car has a really cool set of air horns that never worked. Maybe because they were disconnected. Dang, they're loud!
The Plan: After much consternation and searching, I finally settled on a 400 small block as the replacement engine. In brief, it is set up as a low end focussed torque monster that should run well on pump gas. Desktop dyno says it will REALLY fall off in power after 5000 RPM, mostly because of the intake but also because of the small runner heads, but that suits my use just fine.
Engine Specifications:
400 Small block, bored 30 over (406)
509 block (2 bolt mains)
Edelbrock Performer RPM 170 cc aluminum heads
dished (-12.5cc) stock type pistons and stock rods
SCR 10.1:1
Never did a DCR calc
Edelbrock Performer intake
Full roller rockers (1.52:1)
Q-jet carb, rebuilt and tuned by Lars
Stewart high flow, aluminum water pump
Mellings standard flow and pressure oil pump
TH400 tranny
308 rear end
True dual exhaust
Lunati 60103LK cam
What happened next: I drove the car fo a short period of time with the engine above. I had a number of incidents where the car nearly or completely overheated. I attributed this to the hydroboost unit sticking with the brakes on and inadequate cooling as a result of not running the full fan shroud and foam seals. As a result (I thought) of the overheating the motor developed a very significant shake that got significantly worse over time. I assumed that I had done damage as a result of overheating. On pulling the engine for replacement I discovered that several of the rockers had come loose but by then I had already prepared the new motor that was ready for instalation which I went ahead and did. While it was out, I sold the 400 and the heads both of which turned out to work fine.
Hydroboost repair: The problem was that the brake pedal wouldn't return all the way after depressing the pedal. The hydroboost was strong enough that it would hold the car at idle with this pedal hitch. Again, this is written up in detail elsewhere on this forum but the long and short was that the brake pushrod was on the wrong pedal hole. I switched the hole to which the clevis was attached, added a new brake light strike plate and presto; problem solved!
The stroker: After I thought I had killed the 400, I found an add on Craigslist for a stroker that struck me as an interesting project. The guy was an engine builder nad had assembled all of the parts for a stroker, including a machined block, for his vette. He had run into financial trouble and needed to make rent so I bought the whole kit complete. This included:
73 vette 4 bolt block bored 30 over and clearanced for a stroker crank (needed a little more clearancing when assembled)
Scat 4340 crank
Speed pro hypereutectic pistons
Scat forged rods
Total Seal TS1 rings (gapless second ring)
Nice SFI flexplate
Old, painted damper (what was he thinking?)
Dart Platinum Pro Iron Eagle heads with 72 cc chambers
Manley Stainless valves
Cheepo aluminum roller rockers
Vic Junior intake (which I did not use)
Moroso aluminum water pump
New mellings oil pump (HV)
To this I added a custom grind solid roller cam from Comp:
Comp cam retro solid roller lifters
A custom fitted windage tray (freaking nightmare that was)
Custom dented stock oil pan to accommodate the windage tray.
ARP bolts and main studs to match
Cloyes 2 piece aluminum roller timing cover
The result: Truly the best motor I have ever had the pleasure of driving. To torque was insane. I could spin the wheels at any speed. Pin you back in the seat acceleration. Superb top end. Finally I was happy with an engine.
The saga continues
I've written up the next stage of the saga elsewhere on this forum. The long and short is that one of the pistons blew up for reasons yet unknown (could be floating pin clips or maybe detonation with hypereutectic pistons). When it blew, or more accurately locked up, I was only a half block from home so I was able to coast into my driveway where it sits this morning. I only include one picture here which should tell the story.
Now
While I decide what the next engine will be and assemble the parts, I picked up a cheep, used GM replacement engine so that I can drive the car in the interim. That will go in this morning.
What's next?
Good question. After feeling the power of the stroker, I don't think I want any less than that. The plan all along was to learn from a fairly conventional stoker buildup and then work on a big inch small block build. Grenading a motor wasn't part of the plan, but it happens. In any case, that is the path that I currently am planning. In my mind right now, I plan to pick up a Dart Sportsman block with 350 mains and 4.125 bore. My crank and rods are perfect (replaced the bent rod) so I plan to reuse them. Part of the rational is that while I did plan a larger CI small block the stroke longer than 3.75 seems to create the need for a number of higher priced components for clearance sake. My cam is already a small base circle one but obviously the rods wouldn't work. I suppose I can always change my mind later. That has happened before.
Yet to do: 200 4R conversion (I have the tranny and parts, not the time)
Hydroboost (done 16 AUG 2008))
Refurbish shoulder belts (Replaced 2010)
Body mount replacement
Sidepipes (completed 12 FEB 2011)
Replace soft top (old one installed by untrained monkey)
Repair/replace stereo (Repaired DEC 2010)
Repair rust in birdcage behind kick panel (Repaired NOV 2010)
Replace engine wiring harness (done 27 JUL 2008)
Replace dash wiring harness
High beam headlight upgrade (landing lights)
Repair heater
Refurbish A/C system
Find out why end play so bad on differential
Change 73 oil pressure gauge to electric sender unit
Change clock to tranny or engine oil temperature
Damn, I never should have started this list.