You are using an out of date browser. It may not display this or other websites correctly.
You should upgrade or use an alternative browser.
You should upgrade or use an alternative browser.
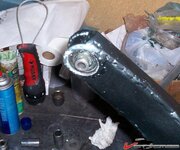
Trailing arms: Johnny Joint install - pics
- Thread starter MYBAD79
- Start date
MYBAD79
Moderator
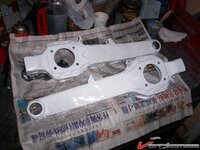
Where do you get your newspaper, Beijing?
Some of the junk that I bought on Ebay was wrapped in this
MYBAD79
Moderator
Twin_Turbo
Der Maulwurf
- Joined
- Mar 5, 2008
- Messages
- 7,575
- Reaction score
- 6
Nice  how are you going to grease it in the future? Why not add a zerk on the top, you might still be able to access it with a flex hose on a grease gun.
tonyv123
Wish,...Wish harder
TT,
I know they're not the same design johnny joints, but with a few drilled holes, couldn't he use the zerk on the through bolt, like the Gulstrand piece?
http://www.guldstrand.com/scripts/prodView.asp?idproduct=104
I know they're not the same design johnny joints, but with a few drilled holes, couldn't he use the zerk on the through bolt, like the Gulstrand piece?
http://www.guldstrand.com/scripts/prodView.asp?idproduct=104
MYBAD79
Moderator
I'll have to see how much room there is inside the trailing arm pocket. Most likely I'm going to drill at an angle into the Johnny Joint so that the Zerk fitting points towards the rear for easier access.
I do not like the idea of a hollow bolt, maybe it's just me but I prefer a solid grade 8 or better bolt for this location.
I am very curious what the stainless bolts that I'm running for the past four years look like. Stainless is softer than grade 8.
I do not like the idea of a hollow bolt, maybe it's just me but I prefer a solid grade 8 or better bolt for this location.
I am very curious what the stainless bolts that I'm running for the past four years look like. Stainless is softer than grade 8.
What did you end up doing for greasing your Johnny Joints?
I'm installing externally greased Johnny Joints, and would like to do a remote zerk fitting on the bottom of the arm, but no luck finding the necessary "plumbing" to do this, although I've seen pics of one done this way.
Really don't want to have to drill thru the frame, but if I have to I have to, just don't know where to yet. All of this indecision has halted my install, cause I have to know what angle to place the zerk, (mine came pre-drilled).
Anyway enough about me, what did you do, and how are the stainless bolts you used holding up?
What did you end up doing for greasing your Johnny Joints?
I'm installing externally greased Johnny Joints, and would like to do a remote zerk fitting on the bottom of the arm, but no luck finding the necessary "plumbing" to do this, although I've seen pics of one done this way.
Really don't want to have to drill thru the frame, but if I have to I have to, just don't know where to yet. All of this indecision has halted my install, cause I have to know what angle to place the zerk, (mine came pre-drilled).
Anyway enough about me, what did you do, and how are the stainless bolts you used holding up?
I did mine with a tube extension.
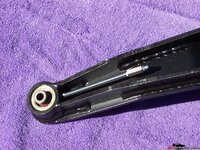
MYBAD79
Moderator
Anyway enough about me, what did you do, and how are the stainless bolts you used holding up?
I have not done anything about the trailing arms since I last updated this thread in dec 2008. The newly rebuilt arms are wrapped in plastic on my shelf, waiting patiently to be installed one day....
I am very likely going to add a grease nipple and drill the arm at an angle - I'll have to disassemble the JJ one more time to do this... don't want any chips from drilling the hole inside the joint....
mrvette
Phantom of the Opera
Anyway enough about me, what did you do, and how are the stainless bolts you used holding up?
I have not done anything about the trailing arms since I last updated this thread in dec 2008. The newly rebuilt arms are wrapped in plastic on my shelf, waiting patiently to be installed one day....
I am very likely going to add a grease nipple and drill the arm at an angle - I'll have to disassemble the JJ one more time to do this... don't want any chips from drilling the hole inside the joint....
Wadda we going to have to DO to get you working again???
:bonkers::flash::goodnight:
MYBAD79
Moderator
Wadda we going to have to DO to get you working again???
:bonkers::flash::goodnight:
Put 8 extra hours in my days.... and 12 extra hours for Saturdays and Sundays please.... :beer:
I like the idea of the johnny joints in the trailing arms. When you get the car all back together I would like to hear your impression of them. I am sure they have to be louder than the rubber or poly bushings but will probably be much smoother and more articulate. Great work.
denpo
Carburated Nihilist
Hey, good revival timing for a thread I keep in my top bookmarks, I just put down my first trailing arm this weekend and the johnny joint are waiting on a shelf nearby.
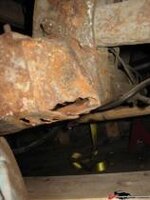
Couldn't just cut the arm bolt, all I did was trashing a pair of sawzall blades with almost no result. So I decided to grind off both end of the bolt and drilled off the outer side. Then twisting the arm a little, it came off easily.:banghead:
By the way I was wondering if the shimming process would differ.
enkeivette
Well-known member
- Joined
- Mar 30, 2008
- Messages
- 990
- Reaction score
- 0
Everyone cries about the TA bolt. I just sprayed PB blaster the night before and took the nut off with a ratchet, then tap tap tap and the bolt slid out.
mrvette
Phantom of the Opera
Everyone cries about the TA bolt. I just sprayed PB blaster the night before and took the nut off with a ratchet, then tap tap tap and the bolt slid out.
:hissyfit: Ca/Desert car.....
1Michel
Well-known member
By the way I was wondering if the shimming process would differ.
Allready asked TT about this a while ago, he said no, it's the same shiming process.
denpo
Carburated Nihilist
MYBAD79
Moderator
By the way I was wondering if the shimming process would differ.
Allready asked TT about this a while ago, he said no, it's the same shiming process.
I am going to install my TAs with JohnnyJoints some time this winter. At the same time I'm going to add upper strut rods and lower the lower strut rods so they're parallel with the half shafts.... I am considering making the front of the TAs fixed using washers. The camber and toe can be adjusted with the strut rods.
Am I missing or overlooking something ???
J. Abbott
Well-known member
How well do the alignment shims fit when using that style joint in there?
How well do the alignment shims fit when using that style joint in there?
I don't thing there are clearance problems. The joint is 2 inches wide and the housing is 1.5 inches. Should be enough clearace.

