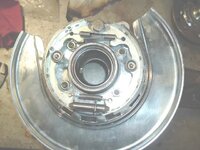
Procedure for replacing rear parking brake springs

big2bird

Charter Member, Founder Bird-Run, Cruise-In Bird-R
Joined
Mar 5, 2008
Messages
5,719
Location
Anaheim, Ca.
Well, Nearbrt's brake job ground to a halt Sunday when we found the springs were broken on the parking brakes. :suicide:One rotor has the rivets removed, and he is drilling out the others.
Can someone post the procedure for him to replace the springs?
Frankly, I've never done this with the hubs in place.:confused2:
 
What springs do you mean? the little circular wound springs that hold the shoes in place or the larger ones for the mechanism itself. As for the shoe retaining springs they can be a pita, invest in the special tool for them, makes life much easier. the larger ones are tough to get in, a special set of spring pliers helps here. All in all not a really bad job but with the inaccessibility on the corvette rear just that more annoying than on a regular car. I did drums on a 63 a couple of months ago and those springs were a bear to get in without busting a knuckle or 2

finally, use copper grease on hinging/adjusting parts and on the backing plate contact nibs or you'll be doing it all again in a few months
 
What springs do you mean? the little circular wound springs that hold the shoes in place or the larger ones for the mechanism itself. As for the shoe retaining springs they can be a pita, invest in the special tool for them, makes life much easier. the larger ones are tough to get in, a special set of spring pliers helps here. All in all not a really bad job but with the inaccessibility on the corvette rear just that more annoying than on a regular car. I did drums on a 63 a couple of months ago and those springs were a bear to get in without busting a knuckle or 2

finally, use copper grease on hingingm adjusting parts and on the backing plate contact nibs or you'll be doing it all again in a few months

???

but years ago getting my t-arms rebuilt at Tony's Corvette shop in G'burg Md, outside DC, they used the SS shoes, and had to change them out for the STEEL shoes, keeping the stainless hardware.....it was a PIA....took him about a hour each side...with the thing all bolted up/spindles done....

so get the steel shoes, and the SS hardware, it seems about as good as can be done....

:thumbs:
 
Jeff
I machine the star wheels and fit the springs in all the new ss kits I use. You can call me and I'll go over the job with you. It can be done,all except one hold down pin,so be careful removing the springs.
 
Pardon my cynicism but that parking brake can't hold shit, even on my driveway....I dunno why it is there....even going forward, it can't hold shit....

the thing was devised to satisfy some .gov demand, it's didn't have to work, just exist...

now many times I have EVER used a emergency brake in some 50 years of driving?? maybe a dozen....seriously....

:devil::smash::thumbs:

Maybe you made them from junk yard Pontiac Camper parts.
 
Jeff
I machine the star wheels and fit the springs in all the new ss kits I use. You can call me and I'll go over the job with you. It can be done,all except one hold down pin,so be careful removing the springs.

Will do. I have done these on regular cars, but never the "micro surgery" thru the hole BS.
 
What springs do you mean? the little circular wound springs that hold the shoes in place or the larger ones for the mechanism itself. As for the shoe retaining springs they can be a pita, invest in the special tool for them, makes life much easier. the larger ones are tough to get in, a special set of spring pliers helps here. All in all not a really bad job but with the inaccessibility on the corvette rear just that more annoying than on a regular car. I did drums on a 63 a couple of months ago and those springs were a bear to get in without busting a knuckle or 2

finally, use copper grease on hingingm adjusting parts and on the backing plate contact nibs or you'll be doing it all again in a few months

I have all the brake tools from yesteryear.

The broken springs are the tension ones at the top. The ones with two small coils. I'll change them all, and clean/anti seeze the star wheels. Just one more PITA project.:surrender:
 
Pardon my cynicism but that parking brake can't hold shit, even on my driveway....I dunno why it is there....even going forward, it can't hold shit....

the thing was devised to satisfy some .gov demand, it's didn't have to work, just exist...

now many times I have EVER used a emergency brake in some 50 years of driving?? maybe a dozen....seriously....

:devil::smash::thumbs:

Maybe you made them from junk yard Pontiac Camper parts.

I bet Poncho parts are better than chebby parts....

I have to check it out when I get the power steering pump hooked up tmrw....then a test drive....I bet it's fine....I can fiddle with some olde tyme junk here till the thing seems to meet Lar's specs pretty close....

and the timing with a initial at 10 only goes to like 16-20 at idle under full manifold vac....at 19" not so good...I think it needs much more....

:amazed:
 
and the timing with a initial at 10 only goes to like 16-20 at idle under full manifold vac....at 19" not so good...I think it needs much more....

:amazed:

Plug the vacuum advance, set the timing to 36* at 3,000 RPM, then let it down to idle. Tell me what you read. Then plug in the advance, and tell me what you read then.;)

Only issue with that is, that when engine is hot, and temps outside are up there in the 90f region....hard starting is the result....engine won't crank with some ~15* advance.....fights the starter too much...

THEN, start at 10*, then set it at 36* at 3,000RPM, then let it idle and see what advance you have. THEN, add the vacuum and check it. THEN, plug the vacuum and reset to 10* idle. THEN, I will know how much total mech advance you have, and how much total vacuum advance you have. YOU are telling me your parameters, OR, mail it to me, and I'll spin it here.
I have a new 560 sun machine coming in two weeks. It's the cat's ass.:thumbs:

Thought you already had a dizzy machine set up...the one with the meters we talked about??

:amazed:
 
I have all the brake tools from yesteryear.

The broken springs are the tension ones at the top. The ones with two small coils. I'll change them all, and clean/anti seeze the star wheels. Just one more PITA project.:surrender:
I have confidence you won't have any trouble with anything except the final step of putting the upper spring ( one with 2 small coils) in place. Its one of those things thats hard to describe the installation. I think everyone has their own little touch for the final step. For me I end up with both shoes shifted to the rear and the rear shoe slightly off the 3 backing plate dimples to get enough clearance to see. The front hook of the dual coil upper spring just hooks in place , I use long needle nose pliers for this. The rear hook is the bitch. I bend the hook on the spring a little tighter and with the special tool (screwdriver with a slot) position the tip of the hook in the hole in the shoe, (its going to be sitting right on the edge,one bump and it will fall out and the cussing will begin), I take a small flat nose round punch and tap the spring into the hole in the shoe with one tap. If your lucky it will snap into place and your done (other than repositioning the shoes back up on top of the backing plate dimples and adjusting the star wheel.) Hope this helps. :thumbs:
 
I've heard of others assembling everything except the star wheel adjuster and then finagling it in last.
 
and the timing with a initial at 10 only goes to like 16-20 at idle under full manifold vac....at 19" not so good...I think it needs much more....

:amazed:

Plug the vacuum advance, set the timing to 36* at 3,000 RPM, then let it down to idle. Tell me what you read. Then plug in the advance, and tell me what you read then.;)

Only issue with that is, that when engine is hot, and temps outside are up there in the 90f region....hard starting is the result....engine won't crank with some ~15* advance.....fights the starter too much...

THEN, start at 10*, then set it at 36* at 3,000RPM, then let it idle and see what advance you have. THEN, add the vacuum and check it. THEN, plug the vacuum and reset to 10* idle. THEN, I will know how much total mech advance you have, and how much total vacuum advance you have. YOU are telling me your parameters, OR, mail it to me, and I'll spin it here.
I have a new 560 sun machine coming in two weeks. It's the cat's ass.:thumbs:

Thought you already had a dizzy machine set up...the one with the meters we talked about??

:amazed:

Yep. Now I have 2. One will be used for HEI's/TI's, and the other for points.
 
Get a long thin blade screw driver. Use a cut off wheel to cut in 2 slots, make the tip like a fork and then put a 45* cut in higher up off the tip. This will grab the spring end and you can push it into the shoe hole. Now some of the springs coming in are bent at the wrong radius and pop out, others the link end it too long and hits the lever and pops out. I mod the star wheels,springs,and levers so they sit flat.

PBshoes.jpg
 
Just take an old screwdriver and as already suggested, use a cutoff wheel to notch it similarly to this:
88-0117-1.jpg
 
Top