70' Convertible 6 Liter LQ4 My Way

sssuch

Well-known member
Joined
Sep 15, 2009
Messages
46
Location
Warsaw Ohio
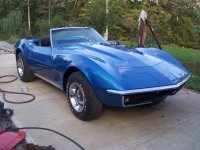
I started this swap about 11 Years ago , got it about 70% done and life got in the way. I originally bought this Car back in 1975 when I was 18 , all that Summer and Fall I beat this poor Car unmercifully dam it was FUN ! Then in 1976 the garage burned and put it out of it's misery. I started rebuilding it about 15 years ago , and was an Interior away from being done when I decided to put a LS in it.
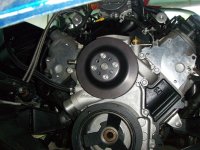
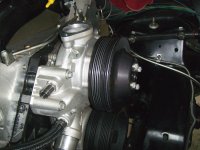
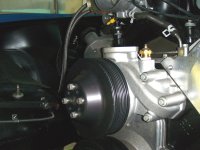
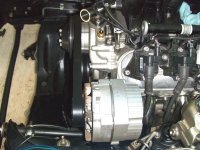
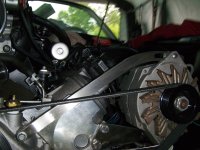
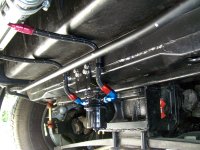
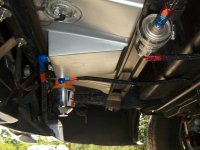
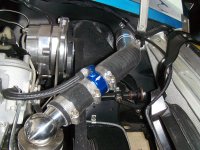
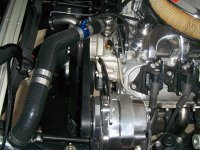
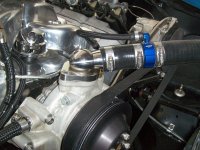
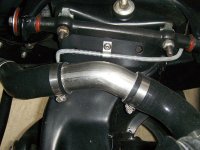
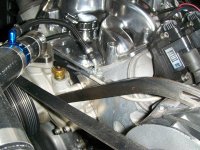
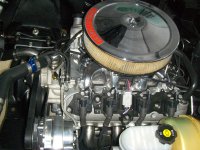
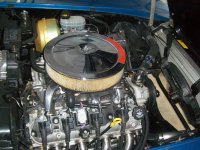
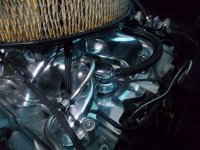
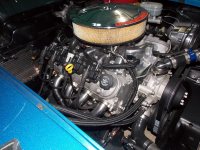
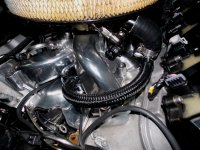
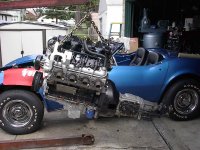
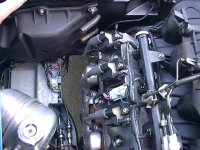
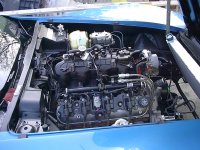
I found a new LQ4 6 Liter on e-bay for a $2900.00 that was complete Injector to Oil pan. Swapped the Truck oil pan for a C5 LS6 pan along with LS6 exhaust manifolds. Also used a billet flywheel along with LS6 clutch and pressure plate, and Lakewood Bellhousing to mate a LS motor to the old style 4 speed T-10 Transmission.
 

Attachments

  • Corvette pic 1047.jpg
    Corvette pic 1047.jpg
    288.3 KB · Views: 23
  • Corvette  014.JPG
    Corvette 014.JPG
    315.5 KB · Views: 45
After lowering the Motor in I bolted the trans up to the crossmember to locate the Bellhousing flange in the same position as the old 350. Then I blocked the motor in the position I wanted , as low as possible while clearing the steering linkage so the Truck Intake would clear the Hood. With that done I welded up a set of stainless steel solid motor mounts.
Everything fit like a glove , the Bat wing Oil pan ,the LS6 Exhaust Manifolds , and the Truck Intake . My Car also doesn't have power steering and it looks like there is not enuf room for the slave cylinder and the Bat Wing Oil pan. With that done it is time to start wireing.
 

Attachments

  • Corvette  016.jpg
    Corvette 016.jpg
    341.8 KB · Views: 32
  • Corvette  008.jpg
    Corvette 008.jpg
    84.7 KB · Views: 30
  • Corvette  024.jpg
    Corvette 024.jpg
    431.6 KB · Views: 32
  • Corvette  1027.jpg
    Corvette 1027.jpg
    958.5 KB · Views: 41
The first problem that I ran into was the clutch cross shaft , the exhaust manifold was in the way about an inch. Hydraulic clutch was out , I just didn't want it, so I started cutting and welding on the cross shaft. I got it to fit but it just didn't look right , it just looked Bubbaed. I guess I'll have to put Hedders on like I wanted to do all along.

About that time the City was giving Me a hard time about working on Cars and the inoperative Car in front of the Garage (72 Corvette getting a frame off ) So We loaded up My Corvette and stored it at Doc's house while I finished His . Then I moved out of the City and put it in storage again . Then broke My Back in two places at Work , slowly gettin better . Now retired so time to get back to workin on My Baby !

First thing to do after storage was to clean it up , it's unbelievable the damage mice can do ! Turds everywhere , wires chewed , the new carpets smell like a urinal it's enuf to get You sick.:sick: 
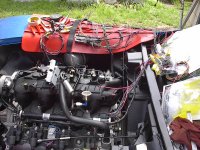
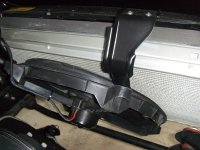
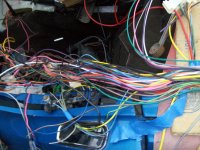
Then You got the Mud Dauber Wasps they pack every bolthole, line, hose , and crevis with mud and dead spiders. Literally took weeks to clean , and the carpet I'll just replace when I do the Interior .

OK back to the build , first I wanted a set of Hedders so I can use the Factory clutch cross shaft. They had to fit the Batwing oil pan , made of stainless steel , fit the C-3 chassis , and not drag the ground on every bump. No One made something even close so I built them Myself. They turned out really great ! Lots of clearance and easy to install . Also did a 1 3/4 to 1 7/8 step on the primary tubes and a V-band clamp on the Collector.

wanted to attach photos of the Hedders here , but it won't let Me because they are allready here : http://www.vettemod.com/forum/showthread.php?t=7323
 
My Corvette only has a Alternator and I wanted to run a belt set up as close to the original Smallblock as possible. Well kinda hard with the LS Waterpump turning in the opposite direction of the Crank. I found an Edelbrock 8895 Waterpump that turns in the same direction as the Crank.
The Pump itself is really well made , Hi-quality that I would expect from Edelbrock. I had to drill out and re tap the heater hose ports to 3/8 pipe thread , -6 O ring fittings are almost impossible to find . Next is what pulley to run. After lots of measuring I went with a Nascar surpluss pulley from E-bay and a Camaro balancer , that along with a shim kit from Moroso and perfect pulley alignment.
 

Attachments

  • Corvette pic 1049.jpg
    Corvette pic 1049.jpg
    549.4 KB · Views: 25
  • Corvette pic 1050.jpg
    Corvette pic 1050.jpg
    496.6 KB · Views: 19
  • Corvette pic 1051.jpg
    Corvette pic 1051.jpg
    447.8 KB · Views: 14
Next up, the Alternator mount . I'm running the original style Alternator that came with My Corvette. Measured for a belt 56 inches , lucked out Dayco makes one this size but not an inch or two larger. Tryed it on , perfect fit and alignment. Also installed a Thermostat housing from Performance Stainless Steel , Wow what a quality piece. The next thing to build is the upper bracket for the adjuster. The original one from the old Smallblock would work but I wanted stainless , so I had to make My own.
 

Attachments

  • Corvette pic 1052.jpg
    Corvette pic 1052.jpg
    516.7 KB · Views: 22
  • Corvette pic 1058.jpg
    Corvette pic 1058.jpg
    184.8 KB · Views: 19
  • Corvette pic 1057.jpg
    Corvette pic 1057.jpg
    168.6 KB · Views: 14
  • Corvette pic 1053.jpg
    Corvette pic 1053.jpg
    500.9 KB · Views: 19
I spent last winter trying to figgure out which way to go with the Injector , I wanted to get MSD's fast unit that does away with the harness and factory ECM. But $3,000.00 that's just too much . And the other way factory ECM and HP tuners , well that ain't cheap neither. I know I can get a mail order tune then have it tuned once its together , but I do everything for Myself . I do know Injection systems been working on them since I was an Oldsmobile Tech in 85-86. And I really know Carburetors been rebuilding and tuneing them for 40 years. Well the field Mice made up My mind when i opened the hood last spring , they chewed up the wire Harness for the injection. Now I put rat poison out by the bucketfull. and gonna load the Car up with mothballs. They may stink but it smells better than mouse piss. The joys of living out in the sticks.

First I ordered a Holley 300-130 dual plain Manifold , It looked OK out of the box , but that would never do for My Baby . So I removed the webbing between the runners , ported and polished the insides , and last gave the outside a full show polish. Got an MSD 6010 to run the coils , along with a used 9380 Holley annular 850 that i rebuilt with new float bowls and billet metering blocks and baseplate. That and several hundred dollars of other stuff like AN fittings , line, fuel pump , and ect.
 

Attachments

  • Corvettepic022.jpg
    Corvettepic022.jpg
    526 KB · Views: 27
  • Corvettepic023.jpg
    Corvettepic023.jpg
    501.2 KB · Views: 26
  • Corvettepic1065.jpg
    Corvettepic1065.jpg
    319.1 KB · Views: 30
  • Corvettepic1066.jpg
    Corvettepic1066.jpg
    163.1 KB · Views: 22
  • Corvettepic027.jpg
    Corvettepic027.jpg
    386.2 KB · Views: 22
Nice thread! Looks like you do some quality work there. That's impressive you were able to get the truck intake to clear. I heard it was 'impossible', but I see it did take a lot of work to get it going.

That intake...you could shave in it!


Nicely done :clap::thumbs:
 
Nice thread! Looks like you do some quality work there. That's impressive you were able to get the truck intake to clear. I heard it was 'impossible', but I see it did take a lot of work to get it going.

That intake...you could shave in it!


Nicely done :clap::thumbs:

Yeh, no shit.....:cool: I had no idea anyone made a carb manifold for the LS engines....:lol:
 
Hay thanks for the compliments

It really wasn't that hard to make the Truck Manifold fit. I had to make a set of motormounts anyway so I just made them to lower the motor by 1/2 inch. Back when I first bolted this Motor in there wasn't all the mailorder mounts and ect. that You can get nowdays. I just love it when someone says "impossible" and never even tried it. I just eyeballed it and said this should fit , hell an Intake, carb, and air cleaner ain't exactly short and it fits.

mrvette, All kinds of Carburated Intakes are available for LS engines . dualplane , single plane , 2 4BBL and tunnel ram . You can even get a single plane like a victor jr with injector bosses and bolt the throttle body where the carb was and have fuelin jection that looks like a carb set up. Stan.

Cool beans, but my '72 grew L98 injection in '95 up north, then I moved here in '97 and needed some mods because of speeds and driving, so I went overdrive auto and roller 350 with L98 which because of a stupid CAM shaft mess I put on a highly modified LT1 induction on it and retained the HEI in the rear.....see pix on sites.....

probably the weirdest shark on record.....did not say NICE, just weird....long story....

:bump::clobbered:
 
Keep this build thread going. Have to do the same to my '73 and like watching this in real time so that I can bother you with questions in real time.

Thanks.
 
Keep this build thread going. Have to do the same to my '73 and like watching this in real time so that I can bother you with questions in real time.

Thanks.

Here You go:thumbs:

Next up , radiator ,hoses , and cooling fan. I modified the brackets on My Radiator support to use a 73 Radiator that had the widest core available. What I wanted was a DeWitts Radiator in black ice , but had to settle for the E-bay special for $160 . This Car is trying to put Me in the poor house !

For the upper and lower hoses the factory hose almost fit with My Waterpump but I wanted something better . For the lower I used a 90* and 45* silicon hose bends and a piece of stainless mandrel bend left over from My Hedders. The upper used two 45*hose bends , a straight coupler , and an adapter to tie into the steam line.

For the Fan I used the fan from My old 84 Z-28 , these can be picked up all day long for $50 also 84-89? Corvette is the same. For the fan mounting brackets I used My old shroud mounts and reversed them and added about 2 inches to the end of it. For lower fan mounts I used two rear Bumper braces welded to the radiator support , it made for a nice clean instlation that looks like GM did it.
 

Attachments

  • Corvette pic 1073.jpg
    Corvette pic 1073.jpg
    189.7 KB · Views: 25
  • Corvette pic 1074.jpg
    Corvette pic 1074.jpg
    217.7 KB · Views: 22
  • Corvette pic 1077.jpg
    Corvette pic 1077.jpg
    200.5 KB · Views: 21
  • Corvette pic 1076.jpg
    Corvette pic 1076.jpg
    220.2 KB · Views: 23
  • Corvette pic 1075.jpg
    Corvette pic 1075.jpg
    216.5 KB · Views: 18
And a few more Pics.
 

Attachments

  • Corvette pic 1078.jpg
    Corvette pic 1078.jpg
    150.9 KB · Views: 14
  • Corvette pic 1079.jpg
    Corvette pic 1079.jpg
    201.3 KB · Views: 13
  • Corvette pic 1080.jpg
    Corvette pic 1080.jpg
    215.7 KB · Views: 13
  • Corvette pic 1072.jpg
    Corvette pic 1072.jpg
    227.6 KB · Views: 28
Everything needs to be wired and the factory wiring leaves a lot to be desired. I never liked the way all of the hot wires attached to the Horn relay that always looked more "Bubba" than some of the bubba repairs I've seen. I used a Fuse / relay box from a late model Impala that I mounted in a fiberglass box of My own design. I now have Relays for the Horn , Fuelpump , Fan , and Ignition hot fuses. Seperate maxi fuses for the ignition switch and other heavy load items, and smaller fuses for other things both constant hot and Ignition hot.

Also wanted modern pulse Wipers , so I adapted the Wiper motor from a 84 Z-28 and added the necessary wiring to a 84-89 Corvette Wiper Switch . I purposely left the wires way long on the Wiper switch because I'm not sure where I'm gonna mount it yet. They work perfect.

While building My Harness I also added the extra wires for the electric Headlight Motors . On the dash harness I did away with wires for stuff I didn't want like Courtesy lights , door ajar , and the interlock to keep the starter from engaging untill You depress the clutch. I also replaced all the Battery + feed wires with a modern hi temp GXL wire.
 

Attachments

  • Corvette pic 1070.jpg
    Corvette pic 1070.jpg
    197.6 KB · Views: 16
  • Corvette pic 1068.jpg
    Corvette pic 1068.jpg
    225.7 KB · Views: 15
  • Corvette pic 1071.jpg
    Corvette pic 1071.jpg
    218.7 KB · Views: 17
  • Corvette pic 1081.jpg
    Corvette pic 1081.jpg
    184.8 KB · Views: 17
  • Corvette pic 1069.jpg
    Corvette pic 1069.jpg
    180.9 KB · Views: 11
Every circuit has a Fuse or a Fuseable link , even the Alternator output has a Fuseable link from a latemodel Silverado's alternator harness. The underhood Harness has one 10 gauge ground wire that connects to everything that needs a ground, and it is grounded to several places on the Motor and the Frame so if one fails there are a couple more. Most connectors are replaced with modern Weatherpack or Metripack sealed 150 or 280 . On the Dash harness the Tach, Speedo , and the center Gauges will all get a connector to un-plug without having to remove all the bulbs and gauge connectors. Here is a couple more pics of My underhood.
 

Attachments

  • Corvette pic 1083.jpg
    Corvette pic 1083.jpg
    216.6 KB · Views: 15
  • Corvette pic 1082.jpg
    Corvette pic 1082.jpg
    231.5 KB · Views: 21
Hay thanks for the compliments

It really wasn't that hard to make the Truck Manifold fit. I had to make a set of motormounts anyway so I just made them to lower the motor by 1/2 inch. Back when I first bolted this Motor in there wasn't all the mailorder mounts and ect. that You can get nowdays. I just love it when someone says "impossible" and never even tried it. I just eyeballed it and said this should fit , hell an Intake, carb, and air cleaner ain't exactly short and it fits.

mrvette, All kinds of Carburated Intakes are available for LS engines . dualplane , single plane , 2 4BBL and tunnel ram . You can even get a single plane like a victor jr with injector bosses and bolt the throttle body where the carb was and have fuelin jection that looks like a carb set up. Stan.

Cool beans, but my '72 grew L98 injection in '95 up north, then I moved here in '97 and needed some mods because of speeds and driving, so I went overdrive auto and roller 350 with L98 which because of a stupid CAM shaft mess I put on a highly modified LT1 induction on it and retained the HEI in the rear.....see pix on sites.....

probably the weirdest shark on record.....did not say NICE, just weird....long story....

:bump::clobbered:
I know what You mean by the driving speeds down in Florida. I was there 20 Years ago , over by Ft Meyrs cruising along at 90-100 when I noticed a white car coming up fast from behind. The radar detector never went off so didn't think it was a cop, then I saw it was a Cadillac. When they passed Me , it was 2 Old Farts in a Coupe de Ville I couldn't believe it ! At that time I was living in Fayette County Pa. and the first of the Monthers all drove around like Mr. Magoo.
 
Last Week I built a new wiring harness that included the wires for the Electric Fuelpump . Started under the dash with a connector plug from a GM front wheel drive transmission that had the exact number of wires that I needed . I removed all the BS wires that I didn't want like courtesy lights , door ajar , and glove box light. Ran all new GXL wires to rear lights and ect. The lights were connected with Weather pack connectors. Then the whole harness was protected with , sealer lined Heat Shrink Tubing .

I never liked the stone age wire socket pigtails for the rear lamps , so I installed new sockets from a Chrysler minivan . I cut the centers out of My Taillight assemblies and opened the hole up untill the new socket just barely fit , then I epoxied it in permanent. They work great , sealed from the elements and no more ground thru the housing . They also use the new style 3157 Bulbs.
 

Attachments

  • Corvette pic 1095.jpg
    Corvette pic 1095.jpg
    202.3 KB · Views: 14
  • Corvette pic 1096.jpg
    Corvette pic 1096.jpg
    164.9 KB · Views: 10
  • Corvette pic 1097.jpg
    Corvette pic 1097.jpg
    186.3 KB · Views: 14
  • Corvette pic 1098.jpg
    Corvette pic 1098.jpg
    180 KB · Views: 13
Last Week , got a couple of reasonably warm Days , so I finished the Crankcase Vent System . First I had to disassemble it down to the Billet Valley Cover. Then took the Hole saw and cut two holes in it for the old style Mopar Oil Separators. From there I hooked them up to a 5/8 "T" fitting that I added an elbow fitting for the 10MM hose to the right Valve Cover , then a 3/4-1" reducing elbow to the Air Cleaner. Reducing elbow only comes in 3/4 on the small end and I needed 5/8 , so a piece of shrink tubing for the wire harness to the 5/8 fitting on the "T" and = perfect fit. I also used the heat shrink Hose Clamps , seem to work great and have a clean look.
 

Attachments

  • Corvette pic 1102.jpg
    Corvette pic 1102.jpg
    588.4 KB · Views: 21
  • Corvette pic 1103.jpg
    Corvette pic 1103.jpg
    827.4 KB · Views: 27
  • Corvette pic 1104.jpg
    Corvette pic 1104.jpg
    602.9 KB · Views: 18
Top