Making one-off parts?

clutchdust

Millionaire Playboy
Joined
Mar 27, 2008
Messages
1,728
Location
In transition
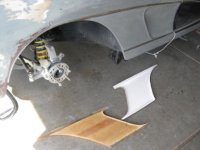
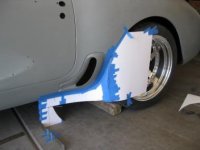
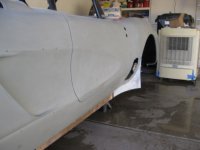
I'm getting comfortable enough with my fiberglassing skills that I'm tempted to make my own parts. In particular, I plan on making a revised fender vent that's significantly larger and looks more like the C6GS vents. I'm also planning on some vents on top of the hood as well, but not like those generic ones that (used?) to be for sale through Ecklers. Anyway, my two biggest concerns about this is how do a make a mock-up for a more complex part like that? And how do I make both sides symmetrical?
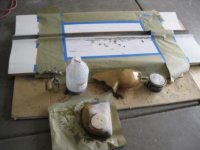
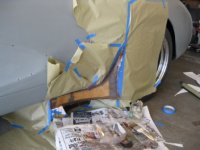
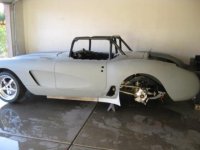
I have made some very basic parts, patches mostly, of flat FG, but I don't know how I'm going to make things with some curves and raises. I'm thinking of creating them with clay and laying the FG over top but I am unsure if I can get the correct dimensions and curves with clay to replicate the parts being modified. Then I don't know how laying FG directly over clay will work out. Finally, I am worried about making both side exact mirror images.
Suggestions?
 
I've built a fair number of pieces - and might offer an idea or two.
They range from simple to increasingly difficult and they are in no particular order. If they were, I'd have finished my book.:eek:

As I read it - you are thinking of making a "male mold" (aka Buck) and glass over it - then remove the piece from the mold. If thats the case - we'll start with the buck. Yes, you can use clay. Clay over chicken wire - over a wooden backbone with sections (bulkheads) to make the basic shape -- just like the big automakers styling studios used to do. Then, the wire/mesh, then the clay (plaster of paris works too) - shape and then you can 'glass. I'd still be using a parting agent - wax and PVA, to get a clean separate. Now 2 choices - that piece can become a Female Mold - with more reinforcements added then parts laid up in side it - smoother finish - or if it is the "final" lots of sand, fill, finish work. Even though its a "one-off" I'd be prone to making a mold (female) as you never know how many; "Hey would you make me one of those?" You'll get more than you might imagine.

The Audio-punks build speaker enclosures using a similar technique - but leave the lumber in the project and use stretchy fabrics - to get the curves right. Again, tha is the under lying - buck.

And. another buck approach - lost foam. You carve -hot wire, sand and shape a piece of foam. get it the way you want - BUT FIRST Check the compatibility of the foam with your RESINS --ALWAYS - ALWAYS - ALWAYS. Else you could watch your beautiful shape melt away like the Christmas snowman in spring. With this method - you do the build up as before, get the finish you want, then remove the foam. Mechanically - or chemically, melt it out of the product.

Material sources range from the Home stores, Wally-World, boating shops, Aircraft supply, etc. Always wear appropriate safety gear, mask, vent the area etc.

Building parts for opposite sides presents a challenge in getting them the same - but there are ways to do that too. But - you didn't ask that - and its off to work for me!

Cheers - Jim
 
Ummm, yes I did.
... And how do I make both sides symmetrical?
And again right here
Finally, I am worried about making both side exact mirror images.
Suggestions?

But thanks for the starter tips. Like I said, I've done some stuff but I have a really hard time with release agents. I like the idea of using the female buck but that produces several extra steps, and again with the release agent thing. What I would like to be able to do is make these parts and get them finished, then literally cut out the factory pieces in big chunks and glass these in their place. Point is, they'll have to be pretty sturdy. I just want to make sure they're as close to mirror images as I can get.
 
Making a plug first can be very hard to visualize accurately.
The easiest is probably to construct a finished product, a vent in a fender 100% finished the way you want it to look and then cast from that with a layer of glass, pop it off and you should have 90% of your plug. From there you can modify it using bondo or anything that hardens enough to be able to shape it more. Then coat that with tooling gelcoat and polish etc to prep for making your mold. You will probably want to incorporate a recessed bonding surface perimeter around your final vent.

Common these days is using a cnc router for plugs if accurate symmetry is needed. Some better cabinet shops have those. Talk to some and see what they are willing to do for a wooden plug. There are even plans for cnc router tables with linear bearings on ebay etc fairly reasonable. Try and contact someone who has built one. This guy made the plugs for the molds he's selling with one.
http://shop.ebay.com/rockcliffmachine/m.html?_nkw=&_armrs=1&_from=&_ipg=&_trksid=p3686

As far as releasing, the basic design is critical. You want slanted surfaces and curves toward the open end of the mold. Try and design that into the look of the part.
For example a mold for a square box will release a lot easier if the sides are at 87° rather than at 90°, but the eye won't detect it.
From there using tooling gelcoat finished to the highest luster and waxing etc. You can also incorporate air or water fittings into the mold to pop it off.
If you have to have really complex shapes, then you need to make 2 part molds that must be taken apart to release the finished piece.

Don't be dismayed if you have to make several plugs and molds improving each, to end up with a final mold.

Sounds like a fun venture.:waxer:
 
Huge difference between making onezy, twozy of something, and committing to production.....

others here know more than me about that, but I been through it a few times....from one of kludge to final QC/shipment....it's a PIA....

:hissyfit::crylol::goodnight:
 
010752 - I didn't even want to get into the CNC aspects - been an addict there for more than a few years - -- and clutchdust that is EXACTLY how you get them both perfectly symmetrical. Machine the molds. ANd do the design in CAD - mill in foam - check fits, mill female molds and then produce the part under vacuum. Yep - done all that and it is fun and time sucking pastime. Kinda like cars! My wife calls the CNC - my "TimeMachine." I go out to work and just never knows when I'll be back.

But, using the build up "frames-technique" you can make your frame structure symmetrical. Make left side pieces - flip it over and copy as a right side piece. Lets you make a "mirror image."

010752 is spot on with release angles too. That's why I'd be prone to making sacrificial molds and melt out the foam when through. That way you can pretty much avoid the challenge of release angle. Makes a mess, and if you used SYROFOAM AND MELTED IT WITH GASOLINE - CAUTION --it makes a poorman's version of napalm!

mrvette - I hear you - I'd just do it for "forum friends" and stay out of "da bidness."

Cheers -Jim
 
By "one-off parts" I assume you mean that you are making one part for your car; not making molds for copies of that part. Is that right?
 
Thanks, all. I may try to call in some favors with some cabinet manufacturers I know. If I make a single side that I'm happy with, I assume they can scan (or some such inspection) the part and then just reverse it in the CNC?

Yes, I'm thinking of making parts specifically for my car. Not that I want to be stingy. If I make them and some people like them, I wouldn't mind being able to cast a few extras.
 
Yes, I'm thinking of making parts specifically for my car. Not that I want to be stingy. If I make them and some people like them, I wouldn't mind being able to cast a few extras.

If you are just making one for your car, you can save yourself a lot of time and trouble by not doing the mold making process.
 
You've gotten some great answers from some guys who know what they are talking about. I'll try to offer a couple more techniques. My car has over 100 hand built parts that required one-off fabrication, bucks, and/or molds -- rear fenders, wing, air dam, diffuser, splitter, firewall, belly pan, and dozens of vents and associated ductwork. I usually build a buck out of the most useful material -- 1 inch pine board, aluminum sheeting, foam, poster board and tape, etc. Then I fiberglass the buck and grind and sand it to a smooth, finished product. I have evolved to the point that I now pull my part directly off the buck so I get a smooth inside and I sand the outside to a smooth surface before I pop it off of the buck. This gives me a part that is smooth on both sides, equal thickness, lighter, and has the appearance of a press molded piece. If I am building the part out of carbon fiber, then I pull a mold off of the buck and lay the CF up in the mold. Two layers of CF and a thin backing layer of fiberglass mat which I sand to give a smooth inside surface. When I built the rear fenders (wider), I covered the stock fenders with plastic boxing tape (so I could release the buck later) and I built the new profile on the car with wood ribs, bulkheads, and stringers -- looked like I was building a boat! I then filled the gaps with foam, sanded the fender to shape, and fiberglassed over the whole contraption -- right on the car. Once it was sanded to shape and finished smooth, I pulled molds off of the fenders -- still attached to the car. After pulling new fenders out of the molds, I cut the old fenders off, built new fender tubs, and glassed the new fenders on. Hope this helps.
 
Hey, Pappy, next time you're up here let me know. Maybe we can get together and I can show you what it is I'm trying to do. Would love to have someone with your experience actually see what I'm doing.
 
Hey, Pappy, next time you're up here let me know. Maybe we can get together and I can show you what it is I'm trying to do. Would love to have someone with your experience actually see what I'm doing.

Will do -- look forward to it. I am building a few parts right now so I took some pictures. Sorry for the poor picture quality, but I have fiberglass dust on everything. The first picture includes the top and bottom half molds for my rear wing which I am using to build a smaller, carbon fiber inverted airfoil/air splitter that goes behind the grill bar and in front of the radiator. Also shown are a jug of PVA mode release and the small gun I use to spray it, a finsihed mold for part of the CF diffuser that goes in front of the radiator, and a can of mold release wax. In the foreground is a partially finished buck for a CF brake cooling inlet duct that goes behind the grill. The second picture has a buck and mold for the for the functional side grill that you see on the car.
 

Attachments

  • IMG_0273.JPG
    IMG_0273.JPG
    30.2 KB · Views: 27
  • IMG_0275.JPG
    IMG_0275.JPG
    29.5 KB · Views: 26
This post is in reply to a PM I received regarding how I would scratch-build fender flares. I am currently buliding removable, carbon fiber side skirts for my car, and the techniques I use are similar, so I included a few construction pictures. I use stiff poster board to form the basic shape, with masking tape to further refine things. Then I put a couple of layers of fiberglass mat over the posterboard. A little sanding and some body filler, and I have a plug that is the final shape. Next, I pull a mold off the "buck", and I make my final piece in that mold. It's a little work (especially when it is 112 degrees in the garage), but this way I can control the thickness of my final part and the outside comes out as smooth as I finish the buck. I build flares the same way. By glassing the posterboard while it is still taped to the car makes sure the final part will fit. I built the wider rear fenders the same way, but I used wooden ribs (like a boat skeleton) and sprayed foam between the wooden ribs. I sanded it to shape, put on a couple of layers of glass, sanded that smooth, and pulled a mold off of the finished shape while it was still part of the car. After I removed the mold, I cut the wood/foam/fiberglass buck off. Hope this helps.
 

Attachments

  • IMG_0312.JPG
    IMG_0312.JPG
    26.3 KB · Views: 27
  • IMG_0313.JPG
    IMG_0313.JPG
    50.4 KB · Views: 25
  • IMG_0316.JPG
    IMG_0316.JPG
    27.7 KB · Views: 32
  • IMG_0317.JPG
    IMG_0317.JPG
    40.6 KB · Views: 24
  • IMG_0318.JPG
    IMG_0318.JPG
    28.4 KB · Views: 25
Top