Fiberglass Air Box Project

BBShark

Garage Monkey
Staff member
Joined
Mar 5, 2008
Messages
4,866
Location
Right here
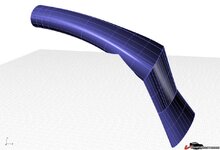
I am going to attempt my first fiberglass project (other than just fiberglass repair). Would like some suggestions on how to do this. Obviously it needs to be structural at underhood temps and the slight vacuum created by the pull of air through the filter.

I figure that I can make cardboard splines from cross sections of the CAD model and glue foam in between. Then shape it, cover it with acrylic tape and fiberglass over the top of it. I understand that the blue foam used for insulation shapes pretty well and the core can be dissolved out with acetone.

Any suggestions are welcomed. The longest length of the airbox is 25 inches.
44e4d23dce799d.jpg
 
Shouldn't you make the notched center section wider so there's not bottleneck as the air pass over the radiator support? Just like the later generation corvettes do?
For the structural strength I'd be naively tempted to glass in metal circle in between layer of fiberglass.
Is your vette injection of Carb'ed?
When you get you design validated I'd love to try this myself, sound like a fun side project for who want cut his teeth on glassing.
 
Shouldn't you make the notched center section wider so there's not bottleneck as the air pass over the radiator support? Just like the later generation corvettes do?
For the structural strength I'd be naively tempted to glass in metal circle in between layer of fiberglass.

It is almost 12 inches wide at the notched area w/ 16sq in area. The filter outlet is 4in dia (which is 12.5 sq in)

I would like to avoid glassing in metal but, if I need it, that's what I'll do.
 
Last edited:
I would make a putty material core that can be molded and hardens then make a two piece mold from it.
 
I dunnno man, but if you fish around on my sites, you can see pix of my up/over air induction....if not good enough, I can take better pix and send to you...email....

but mine was just cheep ebay off the shelf stuff, maybe not the BEST, but good enough and SO much easier....

:surrender:
 
Sounds like you have all the bases covered. You might want to put an armature in the foam so you can rotate the mold as you layup the layers. You will have to roll out the air bubbles on all sides so being able to swing the piece will help. I do not think any metal reinfocement is needed. Many of the commercial pieces are just molded plastic which is much weaker than FRP.

Grampy
 
Good idea about the armature. I am thinking I will use fiberglass "tape" on a roll about 2" wide and mummy wrap it. The rotation should make that easier.

If I do the tape wrap, I guess I should wet the tape as I wrap it. Maybe with a stiff brush.
 
Good idea about the armature. I am thinking I will use fiberglass "tape" on a roll about 2" wide and mummy wrap it. The rotation should make that easier.

If I do the tape wrap, I guess I should wet the tape as I wrap it. Maybe with a stiff brush.
Not sure I would not do it this way.
I would do it like if I was doing a two part mold (but not actually doing it), one big sheet on top, one big sheet on bottom, and two "ribs" on the side were the two halves meets horizontally.
Those two ribs on each side of the duct would not be esthetical but would make it much more rigid.
I do admit that would be much more complicated and probably overkill given the relatively low stress this part have to withstand.
 
i would suggest you try a trial run with the rap dry first. You can use a surrogate material just to get the feel. Transitions can be annoying. You might think about cutting a flat pattern. You can wet this out on the flat an then drape it over the mold and form it to the mold with stiff brush and a roller. A 2/3 of layers of mat should be plenty stiff for an airbox. You can do this in multiple steps if things start to get out of control. Just stop and let the piece harden, then, rough it up, correct any issues and add another layer. This really isn't a structural part. It just needs the have shape intergity and not deflect a lot.

Grampy
 
Go to a Michaels art supply, get your self a bunch of the styrofoam blocks. They will glue together well with a hot glue gun. You can rough shape it with a carving knife, once your happy with the fit, then final shape with a sander/sanding blocks. Wet out some fiberglass and wrap the styrofoam, cover it with some kitchen glad wrap and either tape it up nice and tight with masking tape or get a clothing vacuum bag from Bed Bath and Beyond , throw it in and use a vacuum cleaner to suck the air out.
Let it sit for a day, then unwarp it...you can dig out most of the styrofoam with a screw driver, the rest will come out with some acetone or lacquer thinner. Then give it a second layer of fiberglass and then the sanding/filling painting excercise starts.
This is the same method I use to make my Carbon Fiber parts.

Nick
 
lvrpool32 has the right idea. Using styrofoam to mold the basic shape is great and works well. I also used suran wrap (sp?) over the foam. It makes for a nice, smooth surface. To take it one step further, you can use felt and add your favorite resin. The resin will be absorbed into the felt creating a smoother than fiberglass surface. Audio guys have been doing this for years. Felt can be stretched very tight if needed. Once complete acetone will desolve the foam and the plastic will drop free.
 
Top