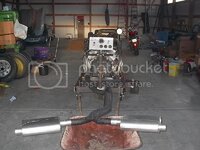
Engine Run stand: Version II

69427

The Artist formerly known as Turbo84
Joined
Mar 30, 2008
Messages
2,972
Location
Clinging to my guns and religion in KCMO.
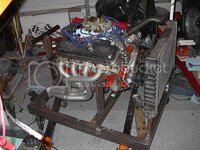
Building another engine run-stand. I built one several years ago, and test ran the engines currently in the '84 (355 turbo) and the 427 I just pulled out of the '69. I sold that engine stand when I moved south, and a few years later I'd like to have it back (I asked, but the guy won't sell it). So, I'm starting another stand. Despite my good luck with the engines in the '69 and '84 (I'm too modest to say it's because of my engine building talent LOL), I am just uncomfortable throwing an engine in that hasn't been run before. So, I'm building another run-stand. I've got the basics tack welded, and am now working on the radiator brackets. I'm using the stock radiator out of the '69 for this (I replaced it with a DeWitt aluminum in the car a couple years ago). After lifting this radiator out of the box, I'm glad I got the light one in the car.
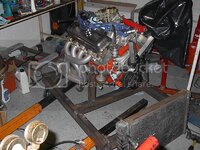
IM001415.jpg

I've got a bunch of new gauges for the stand, but I might save the fancy panel work part for later, as I'm trying to get back to working on the new engine (in the plastic bag in the background). Once I'm done with the mocking-up of the stand, I'll take the engine off and finish the welds. I'm also reusing a bunch of parts off this engine to use on the new engine, so I'll be stripping parts off it soon.
 
:tomato: Our wives should be VERY happy we don't live closer, they's never see either one of us....

get lost in some 'man cave' or other......

:rofl::rofl::shocking::beer:
 
Hmmm - lets see, Gene is in the NE (Jax area?),
and I'm in NW FL (FWB-panhandle),
that new test stand has got to be in South FL for maximum inconvenience!
But it's lookin' real good.

Cheers - Jim
 
Got the radiator situated today. I still need to add some additional bracketry on top to stabilize it. For now I'll use the engine driven fan, but I've got some electric fans in storage that I'll install down the road.

IM001417.jpg

On my previous stand, I had a one gallon metal gas can plumbed to the fuel pump. I prefer those over plastic cans, but so far I've been striking out finding a metal can. So, the search continues.

I'm ready to cut a bunch of holes in some aluminum plate to set the gauges in. Right now I'm not sure where I'm going to put the gauges, but it'll probably be either at the rear of the engine or on the left side. It's easier to to hook up the gauges and throttle cable if it's situated in one of those locations. I also need to pick up a couple switches (ignition toggle and push-to-crank) this week.

As I mentioned earlier I'm reusing the original radiator out of the '69. Obviously these things don't have a radiator cap, so I'm trying to figure out how to terminate the vent tube on it. As a last resort I can pull the expansion tank off the car, but as fragile as they are I hate to mess with it.
 
Looks good Mike. I need more room, as I would like one also.;)
 
Looks good Mike. I need more room, as I would like one also.;)

I'm pretty cramped garage-wise right now compared to last year. We sold our house a couple months ago, and we're temporarily camped out renting a place while we get all our long-term plans worked out. (We're on Plan C, as Plans A and B took a shit.) I've also had to put a lot of stuff in storage, including the '84.
I noticed your stock of engine analyzers in some pics from another thread. I was checking fleabay for a while looking for one (with high voltage probes and CRT), but most were too far away to go pick up. Eventually I hope to find one. I sold my distributor machine when I moved south, so I'm hoping to get another one of them some time, too.
 
I just did a LT-1 break-in on my machine shop buddies break-in stand and I am glad I did. The Vette's paint is too pretty to risk thrashing a newly built motor being laid into the engine compartment with no run-in.

Lucky me! I found out a couple of rocker arm studs are weaping water and looks like the "specialists" that re-radiused the lifters screwed one up and I have to change it out but, the cam seems to be OK (thanks to Joe Gibbs Break In oil being used.)

I'll be able to sleep nights better after pulling all the valvetrain out and checking lifters after 10minutes of run-in time. Glad I'm doing this in an "open enviroment".

Not a single weap of oil out of any gaskets or seals, I feel this is only because it could be quickly fixed, if motor had been in the Vette something would have cropped up.
 
Pressure gauge/relief valve in the cooling system.

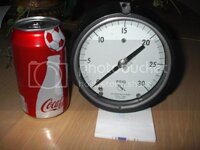
I got a bit more welding done on the stand, and I got an idea on what to do with the vent tube on the upper right corner of the radiator. I don't have a pressure cap in the system, but I was thinking about putting a hose on the tube and running a length of it above the height of the cooling system to a pressure gauge (and a ball valve connected to atmosphere by a Tee in the hose). Once the engine has run a few minutes to allow the thermostat to open and help purge some of the air out of the system, I can then close the ball valve to have a closed system. This will allow pressure to build up to simulate having a radiator cap (and also help me find any coolant leaks), but also be a helpful tool to measure what sort of temperature/pressure relationship there is in the cooling system. In the event of a problem or if the pressure rises too much for comfort, I can open the ball valve and bleed off some of the pressure.

IM001422.jpg

Any issues I'm missing here?

thanks,
Mike
 
Last edited:
Well, I didn't hear any technical objections to the pressure gauge setup, so I made a fixture above the radiator to mount it. The plumbing ought to be pretty straightforward.

Did a dumbass move when finishing the welding. It's so freakin' hot here in Orlando that I've been working in the garage in a Tee-shirt (I usually wear a long sleeve work shirt when in the garage). I did some fabrication and a couple of tack welds on the stand just to make some progress, but things were going so well that I kept going. I pretty much finished all the welding just before dinner time, so I was pretty happy to get this done so I can get back to working on the engine (checking the piston to valve clearance).
Well, while I was cleaning up in the bathroom and putting on some dry, non-sweat-soaked clothes, I noticed that I had a helluva good "welding sunburn" on my arms. First time I've ever done that. I don't plan on doing it again, though. :eek:

:gurney::gurney::gurney:
 
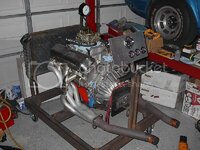
Made a little progress on the stand lately. Got the engine sitting on it, and just doing some work getting some gauges installed. Got a few more holes to drill (and one more gauge to put in the upper right), and also need to install the throttle control lever on the left side.

IM001467.jpg

I've struck out so far finding a (one or two gallon) metal gas can to mount on the frame, and I just don't want to put a plastic one on it. I'm hoping I can find a dust covered one on a back shelf in some little hardware store somewhere. Or, maybe at a rummage sale. LOL
Somewhere I've lost my oil pump driver/primer. I'm hoping I accidentally put it in a box with a bunch of other stuff currently in storage. It's nothing fancy, just a modified distributor out of a '64 327, but I'll be a bit PO'd if I have to make a replacement.
Things are obviously going slower than I like, but I'm gradually getting there.
 
I have a couple of them, but why not a can from paint thinner/something like that ....??

I not used my 2 gallon gas cans in decades, so you welcome to one....

:sos::cool:
 
Small metal gas tank from an old small engine works great. Like something off a snow blower or a tiller.
 
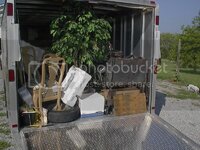
Well, had a trip scheduled up to TimATville to visit in-laws the other week, and I was complaining to the wife about running behind getting the engine stand finished before the trip. She casually mentioned if there was anything I could get done on it while we were up north. I thought about it, and noticed I had a few square feet of trailer area still open (we've been moving stuff up to the relatives for a while), so I rolled the stand (and engine) up into the rear corner of the trailer and tied it down.

IM001469.jpg

I worked on it for a few days there, and then hauled it up to South Dakota to do some more work on it while visiring my relatives. Then hauled it back to KC again. I finally got it all wired up and plumbed, and hit the switch.

IM001477.jpg

Damn if the thing didn't fire right up and run. The first time anything had gone right with this build. Other than a plug wire falling off (#6 which has the dipstick in the way) there wasn't too much headache with the initial two runs. I put about 45 minutes of run time on it. This week's goal is to get the engine back in so I can do some track stuff yet this fall.
 
Getting it right the first time is always a great feeling for me. Nice job.

Really cool of the wife to let you drag it along and with the engine!!!
 
Top